

Rollei 35
My first outing with the Rollei 35 and a roll of Kodak Tri-X
This is a short blog about my first outing with the Rollei 35 and a roll of Kodak Tri-X
About limitations
Analogue photography certainly has its limitations when compared to what's available with modern digital cameras. This however doesn't have to stymie creativity or the enjoyment taking photos. Many will agree that imposing some limitations can help to focus the mind. Surely, this can only serve to make you a better photographer, right? Well, maybe. This is my first outing with the amazing Rollei 35 and a roll of my favourite Kodak Tri-X.
A box with a lens
In the sixties and seventies, cameras were much simpler things than they are today. Basic controls for shutter speed, aperture and ISO were order of the day. A few handy rather than fully automatic features might protect you from over or under exposure but that was about it. Newer cameras had autofocus but most simple cameras from the early 70's relied on mechanical operation, approximation of distance and therefore zone focus. This simple combination worked rather well.
People would take their cameras on holidays, out with the kids and to family or social gatherings without too much thought about what they were using to capture some nice photos of meaningful events and document their social lives.
Thanks to some clever marketing with a major camera manufacturer and David Bailey, small point and shoot cameras like the Olympus Trip and Rollei 35's were very popular at the time. Fitting in the palm of your hand and more conveniently in your pocket, cameras were easy to carry around. A few people still used box brownies or folding cameras like the Zeiss Super Ikonta. Enthusiasts might prefer more capable cameras from Yashica, Pentax or Rolleiflex allowing greater creative control and Medium format film for higher resolution. For the masses however, 35mm in either half-frame or full-frame was commonplace and very convenient.
I doubt my parents knew anything about film types, zone focussing, exposure or depth of field but in 1965 they bought a half-frame, Olympus PEN-EE. They wanted a camera to document their adventures after they got married. I'm assuming my dad would have read the manual but that was likely the extent of his photography knowledge. Film purchased would have been whatever was cheapest at the time. Many companies offered free processing or prints with a film purchase.
Documentary photography
My parents took photos of holidays, their home renovation, family gatherings and the first 8 years of my life. I know this having recently scanned 620 slides found at my Mum's house while clearing it for sale. Like many of their day, my parents hosted the dreaded 'Slide-Show evenings' to show off their holiday pics and I definitely remember those. They took loads of photos. No masterpieces but definitely some precious (to me) memories of my childhood and their early years together as a young couple. With all these now digitised memories, I will eventually put together a photo book.
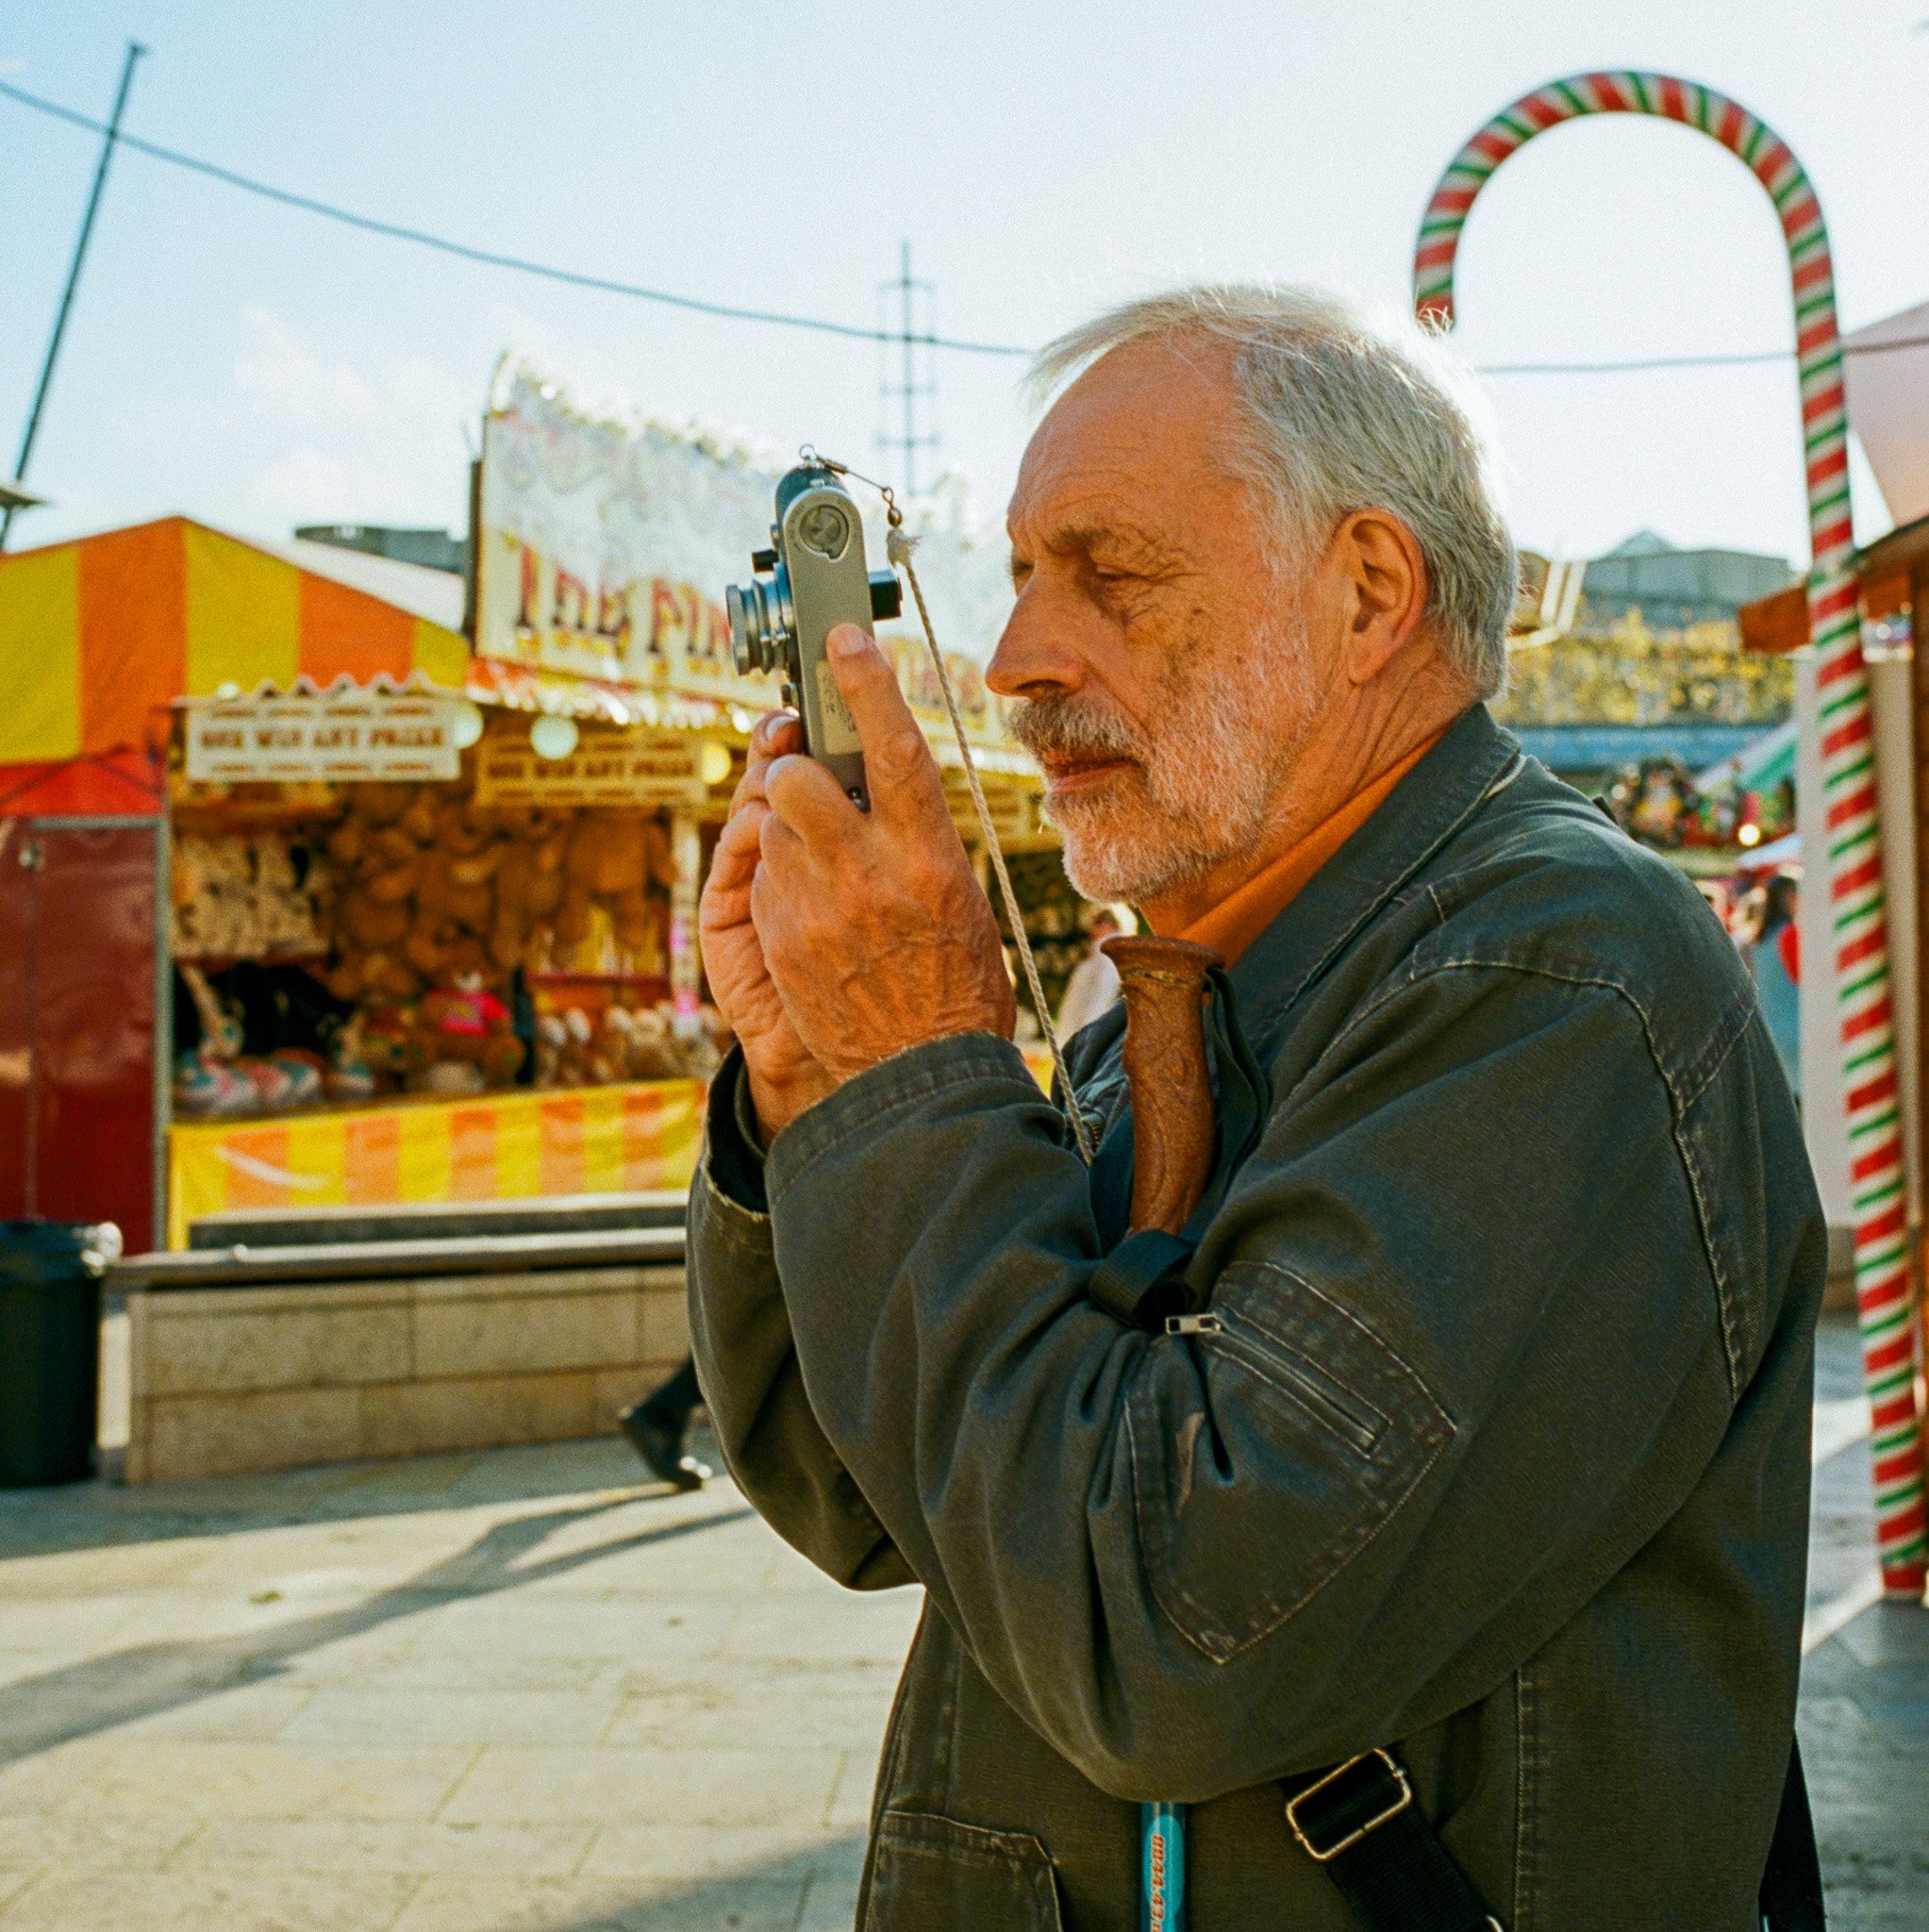
Rollei 35 & Kodak Tri-X
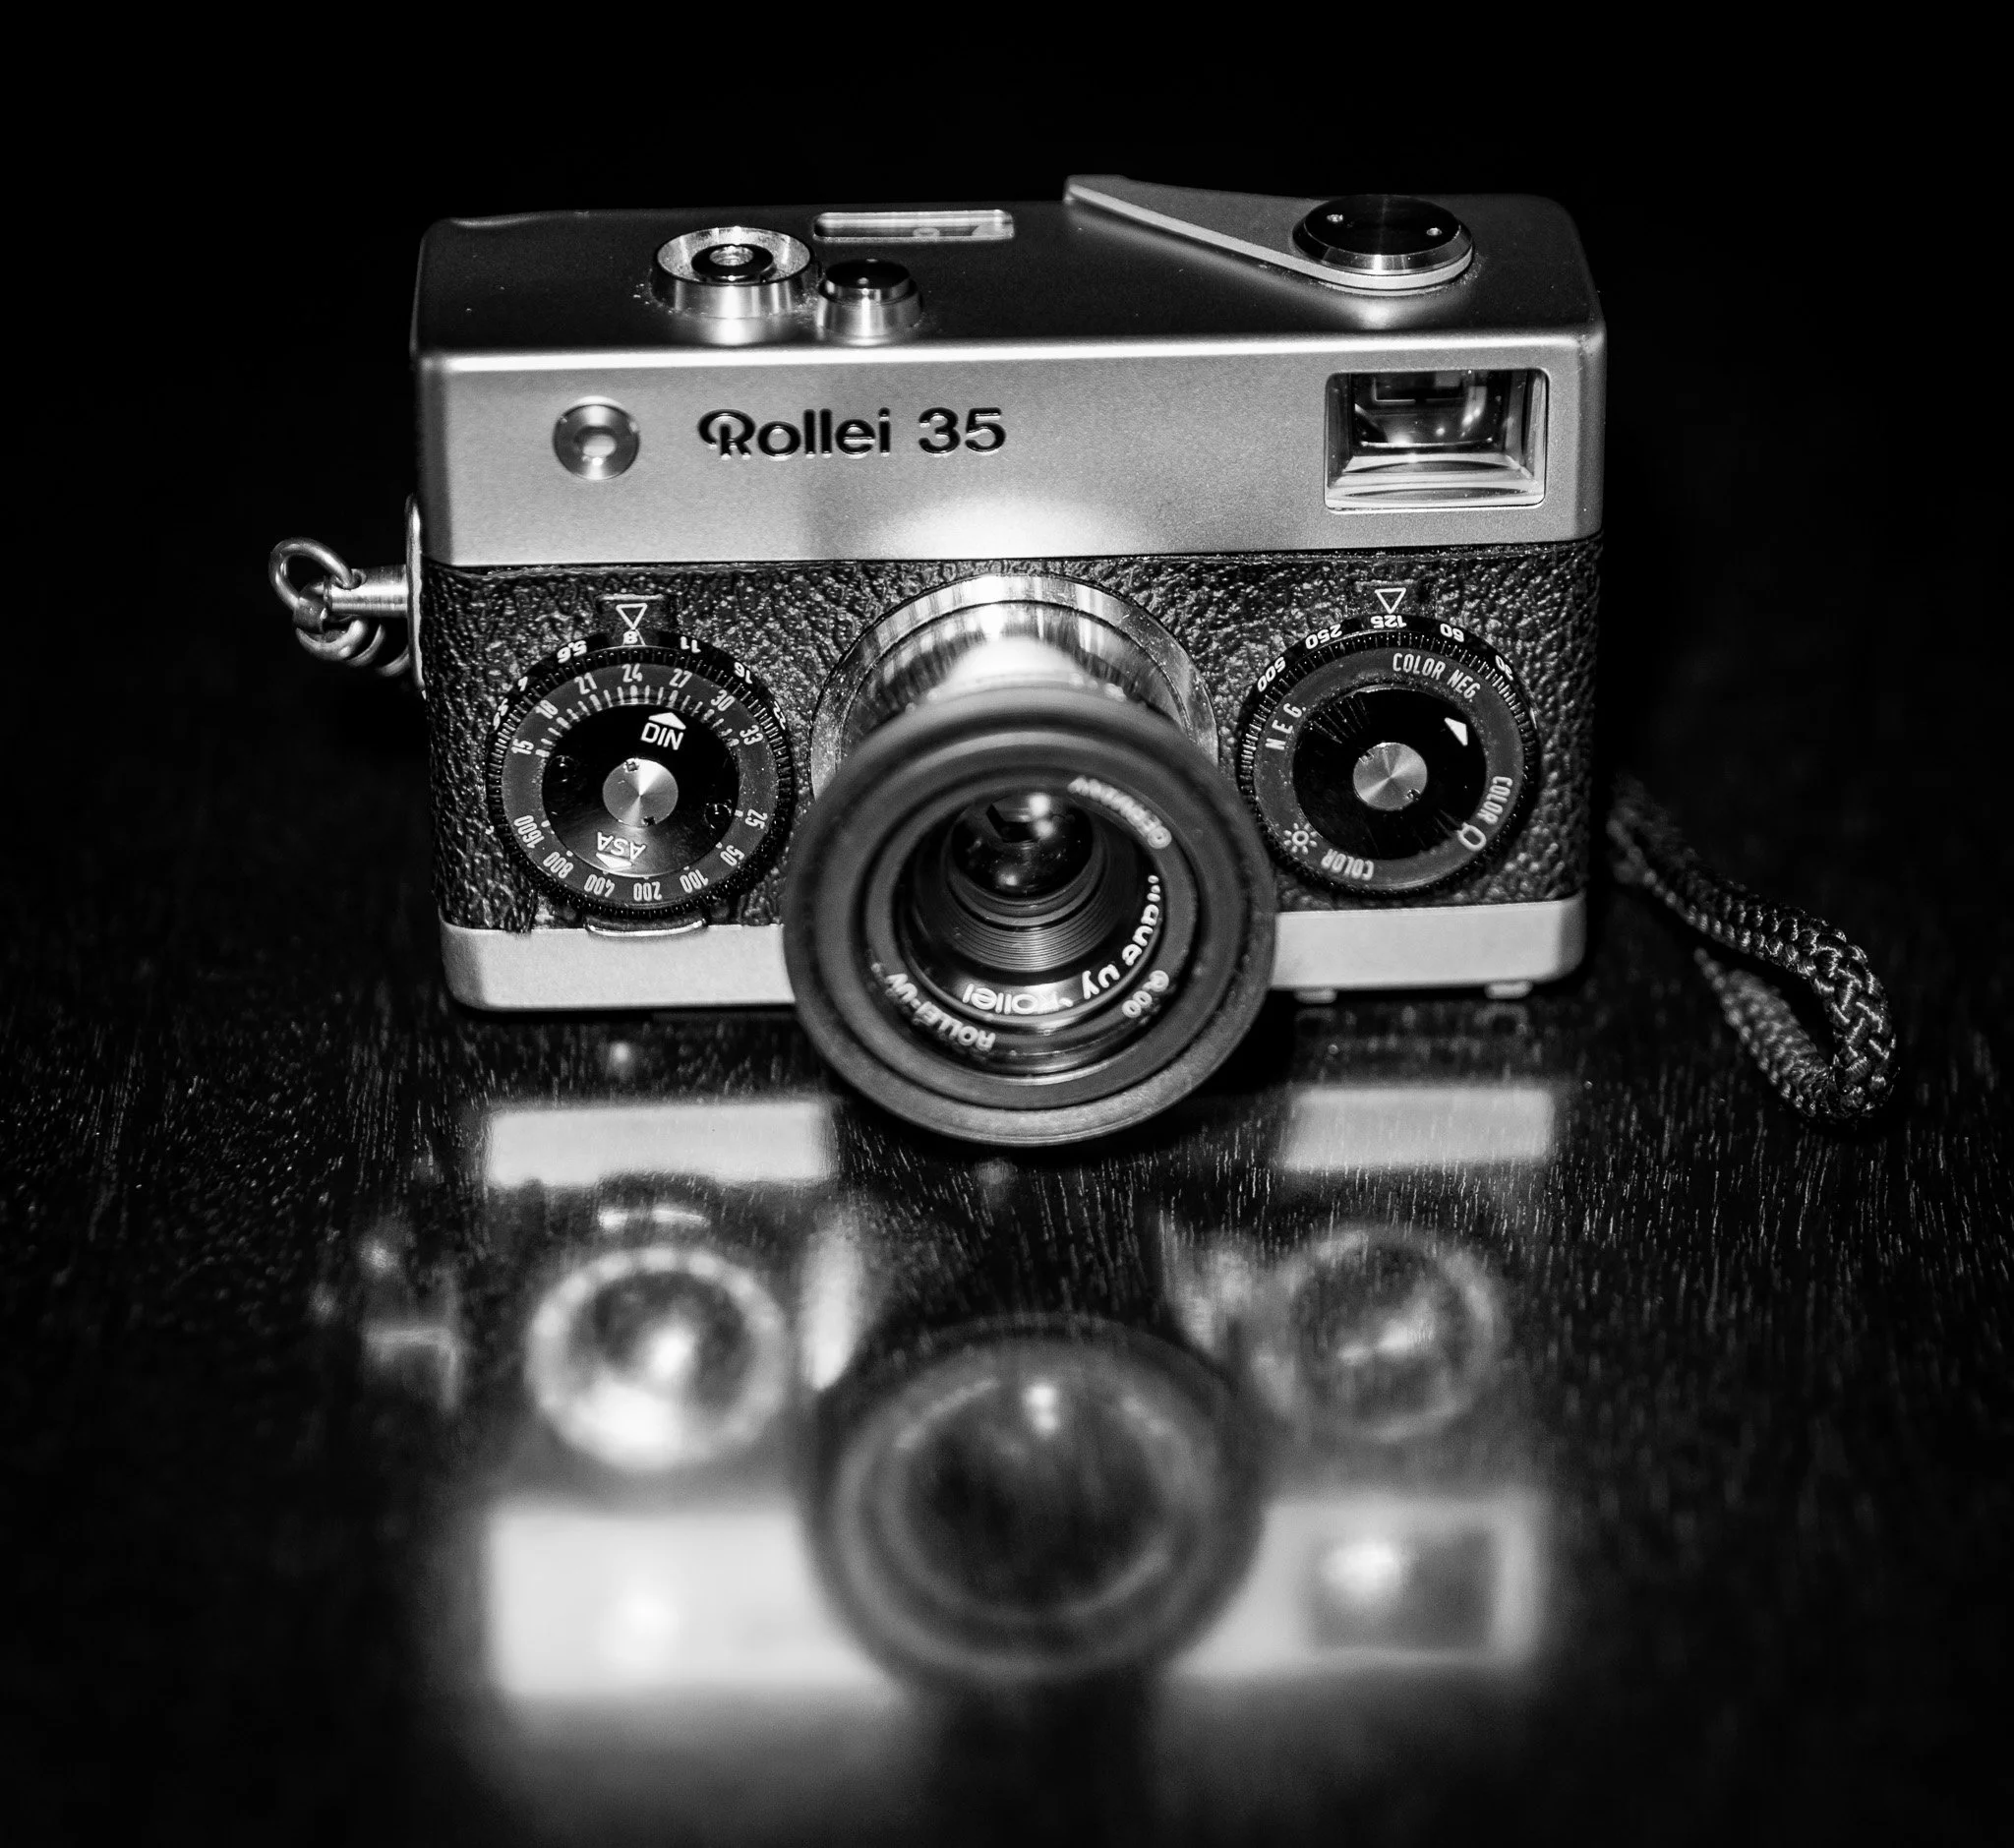
The Rollei 35 was introduced in 1966 as a pocket sized, viewfinder camera. It has an exceptionally sharp, collapsible, 40mm Tessar lens from Zeiss. The design was a little quirky with all the main controls on the front of the camera. Even more quirky, some more controls on the bottom, including the hot shoe and film rewind. To use flash, you'd shoot the camera upside down. The Rollei is a mechanical marvel, capable of stunning images thanks to that Zeiss lens. To my eye, it's a very smart looking camera in use or on the shelf. It would have been aimed more at ordinary people than serious photographers. However, the selling point would be the high-quality lens for better photos. Kodak Tri-X is a professional film extensively used in the past by photo journalists and one of my current favourites. It's perfect for the little Rollei and a great choice for my first time out with it.
There were several variants of the Rollei 35 and when I first saw it, I wanted to own one. Looks alone sold it for me but I was also curious about the 40mm Zeiss lens that people rave about.
Looking around the internet, I stumbled on Jeremy Rata who runs Film Furbish. They have a huge collection of beautifully restored Rollei 35's covering all models. Some of these cameras have custom skins and fancy finishes. All are boxed and presented like new with a leather case and wrist strap.
Rightly so, these cameras are not cheap and despite wanting one, I didn't really want to pay £600 for the pleasure. I kept an eye on eBay and also at my local camera store. I figured sooner or later one will come up for sale and hopefully at a good price.
After some time and for under £180, I was the proud owner of a mint, Singapore made Rollei 35. Sold in full working order and presented with a leather carry case and wrist strap.
Loaded up and ready
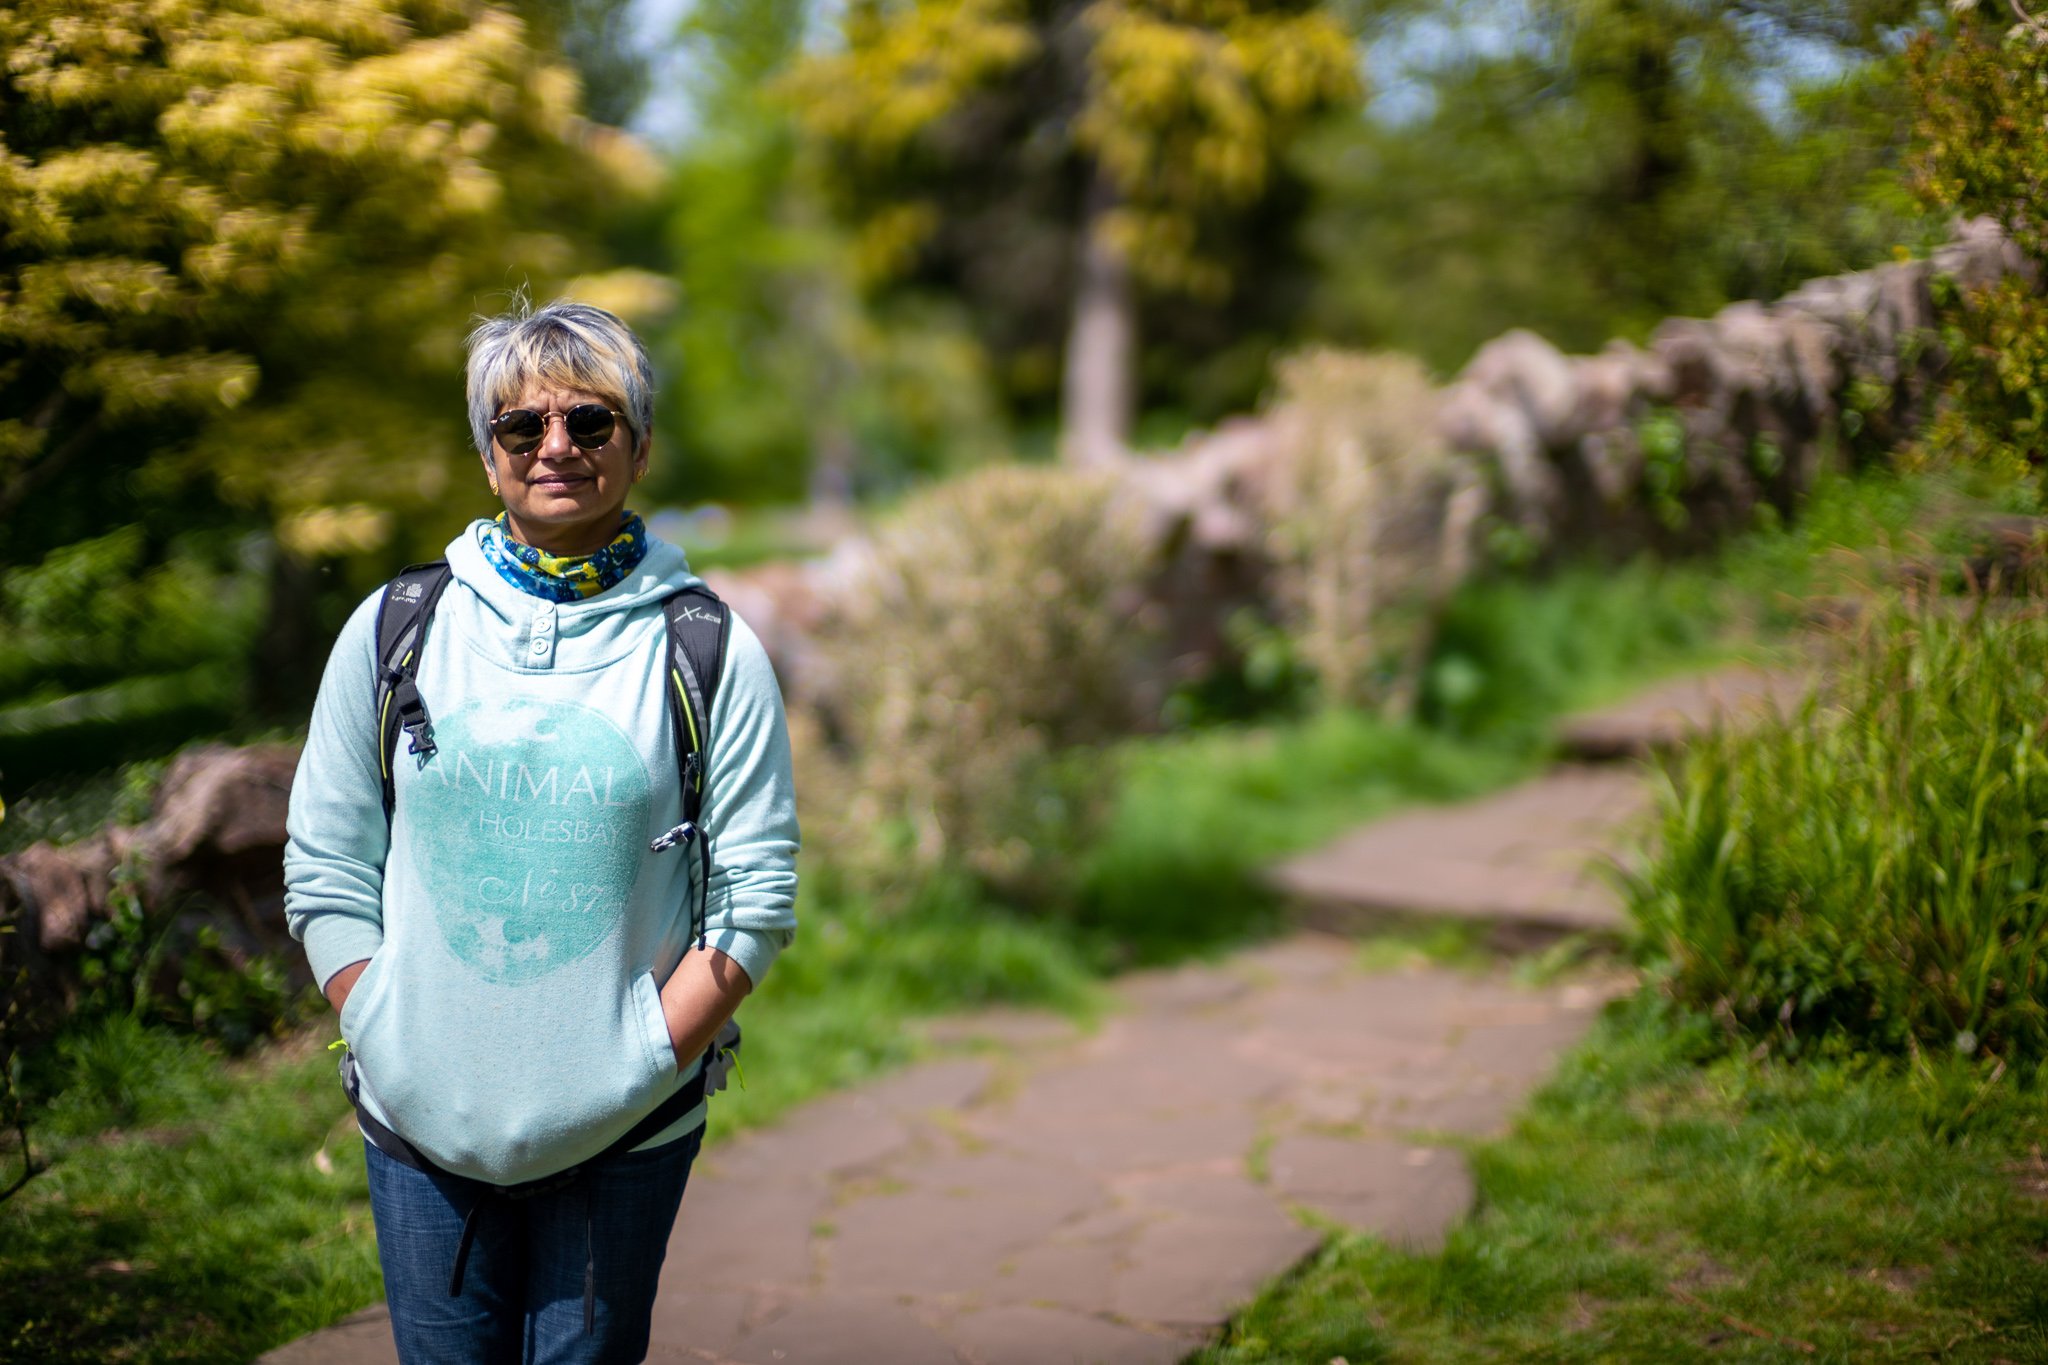
The Rollei has sat around for a few months before I used it, but I always planned to take it out for some street shots. I loaded it some Kodak Tri-X 400 and dropped it in my work bag to take to London. Even if it turned out to be no good, it would look great on the shelf in my office.
Heading home one evening from work, I shot a whole roll quickly so I could develop it later the same say. I took some street photos on the way to the station, a few inside the station and a few more when I got off the train at the other end of the line to walk home. I developed and scanned the images the same day and loaded the images into Lightroom for some basic processing. All images were exposed beautifully, confirming the camera and light meter were working properly.
A great street camera
I really enjoyed using the camera and loved the fact that it was so small. I doubt anyone even noticed me using it, making it well suited for street photography.
The Rollei will get a mention for sure in my 'Year shooting film' project and I'm already looking forward to doing more photos and 'street' shoots with it.
Images were a bit rushed as I wanted to use up the roll quickly. I picked 5 for this article which I like. I'm very happy with the contrast and sharpness of the images even if composition was a little rushed.


Final thoughts
Using the little Rollei 35 has given me another effective tool for Street Photography. It's easy to carry all times and fun to use. I look forward to many more adventures.
For more of my film adventures take a look at my project 'A year shooting film'.
Follow me on Instagram or my website

The Leica Q2 & Workflow
Workflow with the Leica Q2

Leica Q2 - blacked out with tape for stealthy street photography
Introduction:
Anybody used to taking photos with a Digital camera with interchangeable lenses or for that matter, a compact camera with built in zoom, may well consider a fixed lens 28mm full-frame camera a bit limited in it's appeal. After all, how can you shoot everything with a wide-angle lens?
These were certainly some of my own thoughts early on about the Q series cameras from Leica. However, having seen a steady stream of stunning images produced first with the Q then later the Q2, I was very interested to look a little deeper.
For me, photography is as much about workflow as getting the final image. The latter being hugely important to me, else what is the point? but I do need to enjoy using and master control of my cameras. Over time, I've developed my own style and in doing so have integrated with a certain workflow which is in tune with my kit. This is therefore not a review of the Q2, but more my thoughts on workflow and usefulness of this camera and how for me at least it fits neatly in a number of key areas.
Leica cameras have always been pared back and minimalistic. Everything you need and absolutely nothing that you don't, well, almost nothing. Unlike any other cameras I've used in the past, this simplistic approach has had a huge impact on not only the way I take photos, but also how I think about and rate cameras in general. They really need to get out of the way of my photography and leave me in control of creating the final image. Photography is about seeing, not hearing, so I don't want any noises, beeps or to be having a conversation with my camera either.
I use different cameras and adjust workflow slightly for different kinds of photography but am not so rigid that I won't try new things or blur boundaries. One thing in common though is simplicity and control.
My main types of photography are as follows with the associated high-level workflow.
Paid work: (commercial, events, products, custom cars & bikes, lifestyle) I favour pro-mirrorless cameras with good battery life and a wide availability of lenses from super-wide to telephoto. Prime or Zoom lenses with auto focus, or manual focus to suit the type of work.
Street photography & personal projects: Here, I prefer fully manual, mechanical rangefinder cameras with prime lenses only. No beeps or noises allowed except for the shutter and no other distractions other than a rear screen that only comes on when I want it to.
Film photography: (mostly street and personal projects) Manual, mechanical rangefinder cameras preferably with no electronics whatsoever. No dependency on a batteries at all, no screen or display to distract me and one of the most pure photgraphy experiences. Prime lenses shared with my digital rangefinder which I may carry at the same time.
Travel photography - I like using rangefinders but there's no disputing the practicality of something with auto-focus for when you need it. Particularly useful for photos taken by others or where manual focus gets in the way of taking one-handed photos.
The Leica SL and M series cameras fulfil all the above needs for me. The SL being a tank of a camera is often too large for my travel or personal projects. The M is great, but sometimes I just want something I can throw in a rucksack, or tank bag on my motorbike that I'm not worried about knocking out of calibration.
If I had endless funds, I'd buy two of everything giving me backups of all my kit. This is as much for my paid work as my personal projects. Unfortunately, I don't, so up till now my rangefinder is a backup for my pro-mirrorless and vice versa.
Enter the Q2 - It sort of bridges the M (rangefinder) and the SL (pro-mirrorless). Spoiler alert, it actually has enough of it's own personality to major in some areas on it's own such as street and travel photography. It also works perfectly as a backup for any of the other cameras.
Using the same batteries as my SL is a massive bonus and the Q2 has enough megapixels to allow me to crop the 28mm images to get workable 35mm or 50mm images, even 75mm at a push.
When combined with an M, it's like having a second camera with a 28mm lens meaning I can use my favourite focal length 50mm on the rangefinder, but never miss those shots where a 28 or 35 would be better. Crop modes allow even more potential combinations, more on that later.
Short History of the Q Series cameras.
The original Q was very good for business. It was one of Leica's most successful sales stories of recent times. Launched in June 2015, It brought 24MP, full-frame Leica magic in an M-like form factor to the masses. Unlike the M, it has an electronic viewfinder rather than a rangefinder but importantly, is sporting a brilliantly sharp 28mm f1.7 Summilux lens capable of great images. The layout of the Q was similar to that of the current at the time, M240 series, simple and uncluttered.
In March 2019, the Q2 came along with the same form factor, same lens but some improvements over the original Q. Now with a 47MP sensor from the SL2 which allows tangible crop modes and an updated layout, now aligned to the M10 and SL2 series cameras. A real bonus is dust and weather sealing like the SL2 cameras. Still a familiar package but usefully updated and refreshed.
In both the Q and Q2, the specially designed Summilux lens has auto-focus but just like an M-lens has a really usable and all important mechanical focus override via a focus tab which, when unlocked from it's home position (AF), will satisfy any manual focus shooter for useability and feel. With hyperfocal information printed on the lens barrel, it allows for zone focussing too.
Another really nice bonus is the clever 'macro mode' which is mechanically selectable on the lens. Normally the minimum focus distance is a useful 30cm. Selecting Macro mode gives you a new range of 17cm to 30cm which is incredibly useful. The widest aperture reduces to f2.8 in macro mode which is no problem.
As with all Leica cameras, the Q series is built like a tank and feels very solid in the hand.
Leica cameras are expensive
Priced considerably less than an M camera but by no means 'cheap', it has been said you buy the Summilux lens and get the camera thrown in for free. The used market is incredibly buoyant with Q-series cameras which don't tend to hang about for long. For first-time Leica users, they often pave the way to long-lasting relationships with the brand. Used or New, Q cameras offer one of the most affordable entry points into the Leica full-frame system.
Street Photography Workflow:
The first thing you need to do with the Q2 is to understand what it can and can't do well. This will help you decide if it's for you or not. If you already use Leica cameras you'll probably have an idea of how you want to work. If it's your only camera, then it's up to you to develop a workflow that fits with how you like taking photos.
Focus Mode
Autofocus
These cameras are a delight to use for street photography. When I got my first Q, I was on my way home from the shop and only had a partially charged battery. For a bit of fun, I set the ISO and used autofocus as I'd not had this as an option on my rangefinders. I pinged off several shots, many of which I still enjoy and feature on my website today. Whilst I got some great shots, I also missed focus completely on a lot of shots so it's good but not brilliant. I like to hedge my bets a little better than that for street work.
Autofocus in low light really needs the focus assist beam to work so if you've got this enabled be warned, it will definitely attract unwanted attention at night if doing candid street photography with AF mode. Turn it off for street work, and use manual focus or pick areas with high contast.
Autofocus is pretty good if using the viewfinder. It's fast, but as you might expect, when shooting from the hip it can be very unpredictable. Modern mirrorless cameras from other manufacturers have far superior face/eye tracking and generally much better AF systems than the Q2.
To improve my hit rate and not worry about missing focus, I use manual focus most of the time. Either zone focus when shooting from the hip or full manual focus when composing images through the viewfinder. Both methods work very well for me.
Zone Focus
Zone focus is just like using my rangefinder camera and feels very natural. Just set the hyperfocal distance at f5.6 or f8 for roughly 2m to 7m or 2m to infinity respectively and pick a suitable ISO. I usually use between 400 and 6400 to suit the light and enable me to get a decent shutter speed to freeze action at f5.6 or f8. I use this technique to great effect when doing street photography or shooting urban scenes where you don't want to attract too much attention.
Manual Focus through the viewfinder
Regular manual focus through the viewfinder is just like using the SL or more accurately, an M fitted with an EVF as it's not quite as good as the SL viewfinder. Focus peaking allows me set the precise focus area and I've configured the top button of the Q2 to provide magnification when in this mode so I can check critical focus. The auto-zoom was previously enabled which really annoyed me.
Film Styles:
I shoot most of my street photography in black and white, so it stands to reason that I like my preview in black and white. This is easily achieved by setting the film style accordingly. Usually in my case to Black and White high-contrast. I even tweak the settings a little to lighten the shadows and reduce the highlights a bit. A handy thing if you ever want to use JPG's.
RAW or JPG:
As a rule, I shoot all the time in RAW, but I have the camera permanently set on RAW plus Large JPG. Memory cards are huge now and can easily support this mode. I rarely use a JPG image from a street photography set because I end up cropping, or rotating an image to re-frame it, especially if shooting from the hip. Occasionally however, I'll take a nice composed shot and want to share it with someone immediately. Having a JPG on tap, is a handy thing as you can very quickly download it to your iPhone, even do a basic edit and then air-drop it, message or email it to someone in a very short space of time. The last thing you want to do is download 85Mb RAW files on the go and edit them at this stage in LR. You can of course offer to do this later having given someone a preview image first. It's a great conversation starter too, offering to give someone a picture and can help you get some great shots. Don't forget to carry business cards with a link to your website.
Stealth - Black it out
Talking of attracting attention, the Q2 is understated but quite easily recognisable by interested people thanks to that red dot. It is however very easy to make it much more stealthy. Using just three small pieces of black insulation tape, all Leica markings neatly become invisible and the camera blends away nicely into nothing that will start a conversation most of the time.

The Q2 all blacked out works a treat with street photography, particularly at night
Carrying the Q2
When out shooting, I generally use a 120cm strap which loops over my shoulder and under my opposite arm which allows me to grab or use the camera quickly and stealthily. When I'm done I can quickly push it back out of the way. I tend to keep the camera largely out of obvious sight by placing it in front of, or behind me as I'm walking. I usually wear a jacket over the camera too which makes concealment even easier. This approach has the added benefit of making the camera impossible to remove without taking off my jacket first. This also works with a shirt in the summer worn over a t-shirt.
Q2 Street Photography Gallery


Travel Photography Workflow:
Overview:
When on holiday or travelling with the Q2, it's usually a different vibe to street photography and walking around with a camera around your neck is quite acceptable and normal. Do remember however that if you're taking pictures of strangers, as I usually end up doing, or your environment is a tourist hot-spot, you're more or less back in street photography mode so you might want to consider modifying your workflow appropriately.
Pictures of friends, each other, places or things:
The Q2 is great in this environment and I'm usually somewhere between street photography mode with a street photography workflow and holiday mode with an altogether more relaxed workflow.
Autofocus:
I quite often use autofocus mode which includes turning on face recognition for people shots whilst on holiday. This is particularly useful when giving the camera to a friend or passer by to take a picture for you. Do ask them to loop the camera around their neck, or hook into the wrist strap though if it's appropriate to do so. You don't want the camera dropped or worse, snatched.
Film Styles:
Unlike when shooting street photography, I adjust this dynamically so I can visualise the shot how it might end up. Quite often, I'll want to use colour shots for places or landscapes. Sometimes I'll just use black and white.
Crop Modes:
When travelling, these are really useful and I use them all the time. Crop modes help to visualise my final shot, but I've still got latitude to re-crop later if I need to.
As I've generally got a bit more time to compose my shot, I use the crop modes like a bag full of lenses. Ironically, I'd rather carry two camera with 2 lenses than be physically swapping them about on one camera. I treat the crop modes as a zoom lens. When you're on holiday, it's likely you'll want to shoot landscapes, portraits, abstracts, street shots and even macro shots, so having crop modes helps in this environment more than you might think. If I'm shooting street stuff, I'll often walk around with 35mm or 50mm selected but change it at the drop of a hat if I need to. On holiday or whilst travelling, I'll happily use even the 75mm mode. The high mega pixel count works well for these type of photos.
RAW or JPG:
As before, I generally only process RAW files, but when on holiday, you might want to quickly post something on Social Media, or send to a friend over the internet. Having JPGs on hand, in the right film style gives you a quick and easy way to do this.
Carrying the Q2:
It's not quite as important to me to have the camera all blacked out for this type of photography, but it's not a bad thing either. Consider your environment and decide if you think you need to do this or not.
As with Street Photography, I often use an over the shoulder and under the opposite arm 120cm strap but I also sometimes use a wrist strap on holiday with a camera grip. It makes one-handed photos easier and helps others hold the camera as well. The grip can add a little weight, or become slightly cumbersome if worn all day over the shoulder so I'll sometimes just take it off.
Q2 Travel Photography Album


Event Photography Workflow:
I tend to use my SL for events, but as I said the Q2 makes a good backup, or second camera at an event, especially if you're mingling among people, taking candid shots such as at a wedding or party.
Autofocus or Manual:
The focus mode entirely needs to match the type of shooting. If there's a lot of quick fire shooting and the light is good, then AF works well and it's OK to use the focus beam, even at night.
Manual focus also works well at these events, but be aware that in low-light the viewfinder can be a bit slow to refresh.
Flash:
I have a couple of flash units which work brilliantly with the Q2. The first is the SF40. It's small, light weight has fully auto, or fully manual operation with the Q2. Flash Exposure Compensation works well and I like to use a very light fill flash rather than full scene illumination. The SF40 has a video mode too, which I sometime use as a simple constant light source, but I don't use it often. I also have a larger canon flash which will work on the Q2 in manual mode but it's a bit large. Certain events, require the use of studio flash heads to illuminate a scene which I can radio trigger from the SL, or the Q2 if needed. LED constant light studio heads are also good for scene illumination and less annoying than flash heads.
Viewfinder or Rear Screen:
Events are one of the only places where I'll use the rear screen to compose a shot. Recently, I used the Q2 at a Jewish engagement party in London. It's traditional to lift the bride and groom to be up in chairs above the crowd and dance around with them for a bit. It's a load of fun, but you have to be right in amongst the action to photograph it, and you need to hold the camera high-up to get the shot. Using the rear screen in this environment worked very well. I've done similar things at weddings and corporate events.
Q2 Event Photography Gallery


Other Considerations for setting up the Q2
Configurable buttons
One of the nice features of the Q2 is the ability to configure the programmable buttons for multiple or single functions.
The FN button:
On mine, the FN button selects the EVF mode by default which is usually set to EVF extended. This means that the rear screen only comes on when I hit the play or menu button. I've configured a second function on the FN button for the self-timer. I don't use it often, but it's there if I want it.
The Top Button:
My top function button serves one of three regular functions as required.
ISO:
Typically I'll use it to select ISO as I've never trusted or used auto ISO. It plays with my head, especially as I like to try to work out exposure settings for a given scene. That is a throwback from my film work.
Film Style:
I use this button to select the film style I need when I'm in Travel Photography mode. Usually set to standard for colour, or Black & White high-contrast.
Magnification:
Magnification is an essential option when using manual focus and doing street or event photography. At the press of this button, I can magnify the viewfinder, or screen instantly, and zoom in or out using the wheel. This allows me to quickly check critical focus. Moving the cross hairs onto the point of interest first like I would on the SL makes the magnification centre on that spot.
Considerations for shooting JPG or RAW
As previously mentioned, RAW images are more versatile and afford you more headroom for post-processing than a JPG. You lose around 85% of the information captured if you shoot JPG only and of course JPGs captured in B&W can never be turned back to colour. That said, JPG files are very good on the Q2 and quite usable if you don't relish editing tons of holiday photos in lightroom and would prefer to do it on your iPhone.
You'll certainly benefit from the significantly smaller JPG file sizes and quicker wireless transfer speeds to your iPhone via Leica Fotos. Q2 RAW files are around 85Mb each and take ages to transfer wirelessly making multiple files over wireless a bit of a no-go. You're better off inserting the memory card into an SD card reader and load them onto your computer or tablet that way instead.
Personally, I always shoot RAW and Large JPG files simultaneously. I process the RAW files when I get home or back to the office and usually junk the in-camera JPGs if I've not used them. I create new ones from my Lightroom edits.
Crop modes - 28mm, 35mm, 50mm & 75mm
Personally, if I could shoot everything with a 50mm lens, I would. It's my favourite focal length offering accurate perspective and maximum creativity with depth of field with fast glass. Sadly, it's a bit too tight to be a universal focal length for me. I have however, travelled the world extensively with a 35mm prime lens successfully. It's a nice compromise between 28mm and 50mm offering potentially the best of both worlds. The Q2's 28mm lens isn't my ideal focal length but with 47 mega pixels and useful crop modes, it is suddenly a really good fit.
When you select a crop mode, 35mm, 50mm or 75mm the camera does two things:
JPG files, are cropped to the field of view you selected complete with EXIF data to match. The additional megapixels make this highly useable.
RAW files remain full-frame 28mm, but if you open them in Adobe Lightroom, they are also cropped but you can still move the full-frame image around, or move the crop if you wish. The EXIF data however will always show 28mm for the RAW files.
If using a maximum crop of 75mm you'll lose a lot of mega pixels but from RAW you can easily digitally up-size the file again to produce a decent sized JPG. Starting at 47 megapixels, there's plenty of scope for cropping and retaining a good level of detail, something the older first generation Q lacked. The ability to upsize is especially useful and obviously much better done from the RAW files.
Crop modes come into their own when travelling, giving you effectively 4 lenses to choose from which I personally find really useful.
One downside to mention of crop modes is that they are just that, CROPPED 28mm IMAGES. Don't expect 35, 50 or 75mm Summilux characteristics. A 50mm lens will give you more accurate perspective of your subject where a 28mm stretch & warp things if you shoot close up. A 75mm lens will add an element of compression to an image that you won't get at 28mm.
Macro shots:
Macro lenses are very much in the specialist area, designed for very close in shots. Most AF zooms will let you shoot in to 30cm from your subject, a macro lens will let you get much closer (10cm maybe) with a reproduction ratio of 1:1 or near enough.
I wouldn't call the Q2 a macro camera, but it's definitely a useful mode allowing you to get much closer to your subject, dabble with macro photography, or just take some interesting shots close up. With the extra megapixels, macro shots of bugs, berries and flowers come with exceptional detail. True macro photography requires specialist lenses, 1:1 reproduction and good lighting.
Macro Shots


Depth of Field:
What about depth of field? One of the things that defines professional images, is the ability to separate the subject from both the foreground and the background for an almost 3D effect.
Leica photographers love narrow depth of field. The 'Bokeh' that makes portraits really pop is a well used feature with Summilux lenses from Leica.
It's perfectly possible to get beautiful bokeh shots from the Q2 but remember it's still a 28mm lens. It will produce really nice portraits, blurred foregrounds and back grounds but you have to work a little harder. It's not going to perform like a 50mm Summilux but close focus will help maximise bokeh effects from this brilliant lens.
I photograph a lot of cars and bikes where I rely on bokeh and narrow depth of field for artistic effect. I've tried, and would NOT generally use the Q2 for this because the 28mm lens tends to change perspective too much for my taste. I shoot this stuff almost exclusively with a 50mm f1.4 lens. The Q2 will never render the shots in the same way as a 50mm lens but if it's all you've got with you, it'll do a reasonable job.
Another thing to consider is that the Q2 has an electronic shutter which can go up to 1/40,000th of a second. This is enough to shoot wide-open in any conditions, including bright sunlight without the use of an ND filter. This is a huge bonus over older M-Series cameras.
Low Light Performance
The Q2 isn’t the best low-light performer, but it’s not the worst either. It’s comparable to the SL2 which shares the same sensor but nowhere near as good as the SL2-S, which has a new back-side-illumiated sensor with outstanding low-light performance. It’s not as good as a late generation M camera either.
It will however produce solid results and with a little noise correction excellent images can be achieved. I’m quite happy shooting at ISO3200 or even ISO6400 at night. The f1.7 lens helps a lot here.
The following shots are all done in low-light with and ISO of 3200 or above.


So who is it for then?
If you're in the market for a Leica camera that you can literally take anywhere that won't take up too much room in your bag, or cost too much to buy, then the Q2 could be ideal.
Furthermore, if you own the SL and use this as your main camera, the Q2 uses the same battery and a similar menu and operating layout to the Q2. Crop modes and 47MP make the Q2 a good companion to the SL - (Type 601, SL2-S and the SL2).
If you shoot Leica M cameras. The chances are you're already used to shooting prime lenses. If you happen to favour 28, 35 or 50mm lenses or a mixture of all three, then the Q2 once again could be a perfect fit. Additional flexibility of hybrid electronic shutter, but still with full manual control and focus make the Q2 a reliable backup for your M-Camera.
If you shoot film, the Q2 makes a good digital backup allowing you to test a shot for metering and see exactly how it's going to look before you commit to film, or start bracketing exposures.
If you like to travel light, or on a bicycle, or motorbike then the Q2 is a good companion. It's light, weatherproof and built like a tank so it can take a few knocks without worry of jarring a delicate rangefinder mechanism.
If you enjoy street photography, the Q2, particularly good. When blacked out like mine, it looks like nothing special. It's small, inconspicuous and won't attract much unwanted attention. A little black insulation tape goes a long way for this.
If you're getting into using Leica cameras (and lenses) for the first time. The Q or Q2 are a relatively inexpensive way to enjoy the full-frame Leica experience. There are plenty of used cameras available and you'll not lose much money if you trade up for something else later when you buy used. At the time of writing, there is already talk of a Q3 in 2023, so the prices of Q's and Q2 are very good and likely to fall a bit.

Film Friday, Saturday, Sunday
Working with Film for a change

I borrowed the idea for this shot from Paul but used my own props.
Why film all of a sudden?
In a world filled with digital distractions, it’s nice to get away from it all and do something completely analogue occasionally. It doesn’t come any more analogue than using a fully mechanical camera with no electronics and shooting film. Doing so will almost certainly sharpen your photographic skills. You’ll have to work out your exposure and do everything manually so there’s plenty in which to immerse yourself.
No light meter, no worries
My camera has no light meter, so when I bought it a few years ago, I quickly learned to use the ‘Sunny-16’ rule to work out my base exposure. I can then compensate for light source or desired aperture to suit the shot. As a backup, I use an old Sekonic light meter which I’ve had since my studio days. If you don’t want to use a light meter, there are numerous Apps available for smartphones. These work surprisingly well, and I’ve downloaded and had good success with my LIGHTMETER Pro.
You’ll improve your skills more quickly if you work out exposure in your head before checking on a light meter. I’m usually close enough and film is much more forgiving than digital. Sunny-16 is intuitive and gets easier the more you use it. You can also use it when shooting digital if you want to try it out.
So, Film Friday it is… or as it turned out I shot film for a long weekend.
Camera & film choices
There are very few new film cameras, so I dusted off my 1946 Leica iiic and my considerably more modern, 1967 Leica M4 and loaded them both up with some colour film for a change as I normally shoot black and white. Both cameras are in great condition and perfect working order.
The iiic got a roll of Kodak Portra 400. A good choice given that the only lens I have for this camera is a 50mm Elmar f3.4 which is nicely sharp, but not very fast. It’s also of the ‘collapsible’ variety making the camera and lens, brilliantly pocketable. I bought this camera originally to admire as a collector piece as it was cheap and very pretty. What a waste, it’s such a delight to use and it’s in perfect working order. Tom made me do it! He put a roll of HP5 in it the day I bought it, so I had to test it out. I’m so glad I did, thanks Tom!
As it happened, the M4 was already loaded with a less than half-used roll of Fujifilm Superia 400. I was previously keen to test this film in the M4 and had not finished the roll on the day. As is often the case when I do this, I had absolutely no idea what was already on this film. Note to self… never do that again!
Film Friday - Just do it !
With plenty of remaining shots, that took care of my Friday. Packing the M4 with me everywhere I went, I used up the remaining shots out on my bike, photos of friends, a trip to London, my wife and a few more at my local bike shop.
The thing about Fridays is that I could be anywhere. I’ve heard the term Film Friday many times. Maybe this should be a regular thing? What do you think?
Leica M4 / Fujifilm Superia 400 / 50 or 35mm Summilux f1.4


The lenses - A modern twist
My cameras are all very old, but my M4 can use the latest modern M The cameras are all very old, but my M4 will take the latest modern M lenses. My go-to lens is always my 50mm Summilux f1.4. It’s brilliantly sharp and contrasty with almost 3D rendering wide open.
I also took a 35mm Summilux for a wider view (better for street shots). It’s the newest version with close focus not that this will be much help on a rangefinder limited to 0.7m.
Lastly, the formidable and slightly outrageous 50mm Noctilux M, f0.95. A behemoth of a lens but one of my all-time favourites for turning the most mundane scenes into art. I’m going to need some slower film to use it though as I don’t have a 60mm ND filter. Using some Kodak Ektar 100, I’ve half a chance in low-light or indoors of opening up the Noctilux.
Film Saturday - Bristol never disappoints
Once I’d finished up the Fujifilm Superia on Friday, I loaded the M4 with a roll of Ektar 100 ready for Saturday.
Bristol is great for street photography. The same could possibly be said for any city centre, but I live in Bristol and the people are very friendly and I never get bored taking photos here.
I’ve been thinking to do a film day for a while, so I posted my ‘film Saturday shoot’ on Facebook and arranged a meet up with a small group of friends in the city centre with the sole intention to shoot film for a day.
I was in good company with Tom, Paul and Steve joining me with some very old and interesting hardware. My 1967 M4 was actually the newest camera in use on the day. Paul was sporting a 1930’s iiia with a Russian turret viewfinder and 3.5cm lens. Tom, a 1950’s iiif in mint condition with a 5cm Elmar 3.5 and a very neat shoe mounted viewfinder which was really bright and very nice to use. Steve seemingly didn’t get the ‘film memo’ and brought his digital M10 and Leica Q which was funny but at least he posed for a few pictures
The newest camera of the bunch is 56 years old !


We walked about in the city centre, stopping at a few favourite coffee shops, the Harbourside and College Green. Millennium square had a fun fair and we visited some of the other usual haunts. After a few hours I eventually caught the bus home having used a whole roll of film in the M4 and most of the roll in the iiic. I find it very difficult to ‘hose-off’ shots on a film camera in the same way that I might on digital so it took me some time to select where to use it.
Leica M4 / Kodak Ektar 100 / 50mm Noctilux or 35mm Summilux


Leica iiic / Portra 400 / 5cm f3.5 Elmar


Film Sunday - Head to the beach
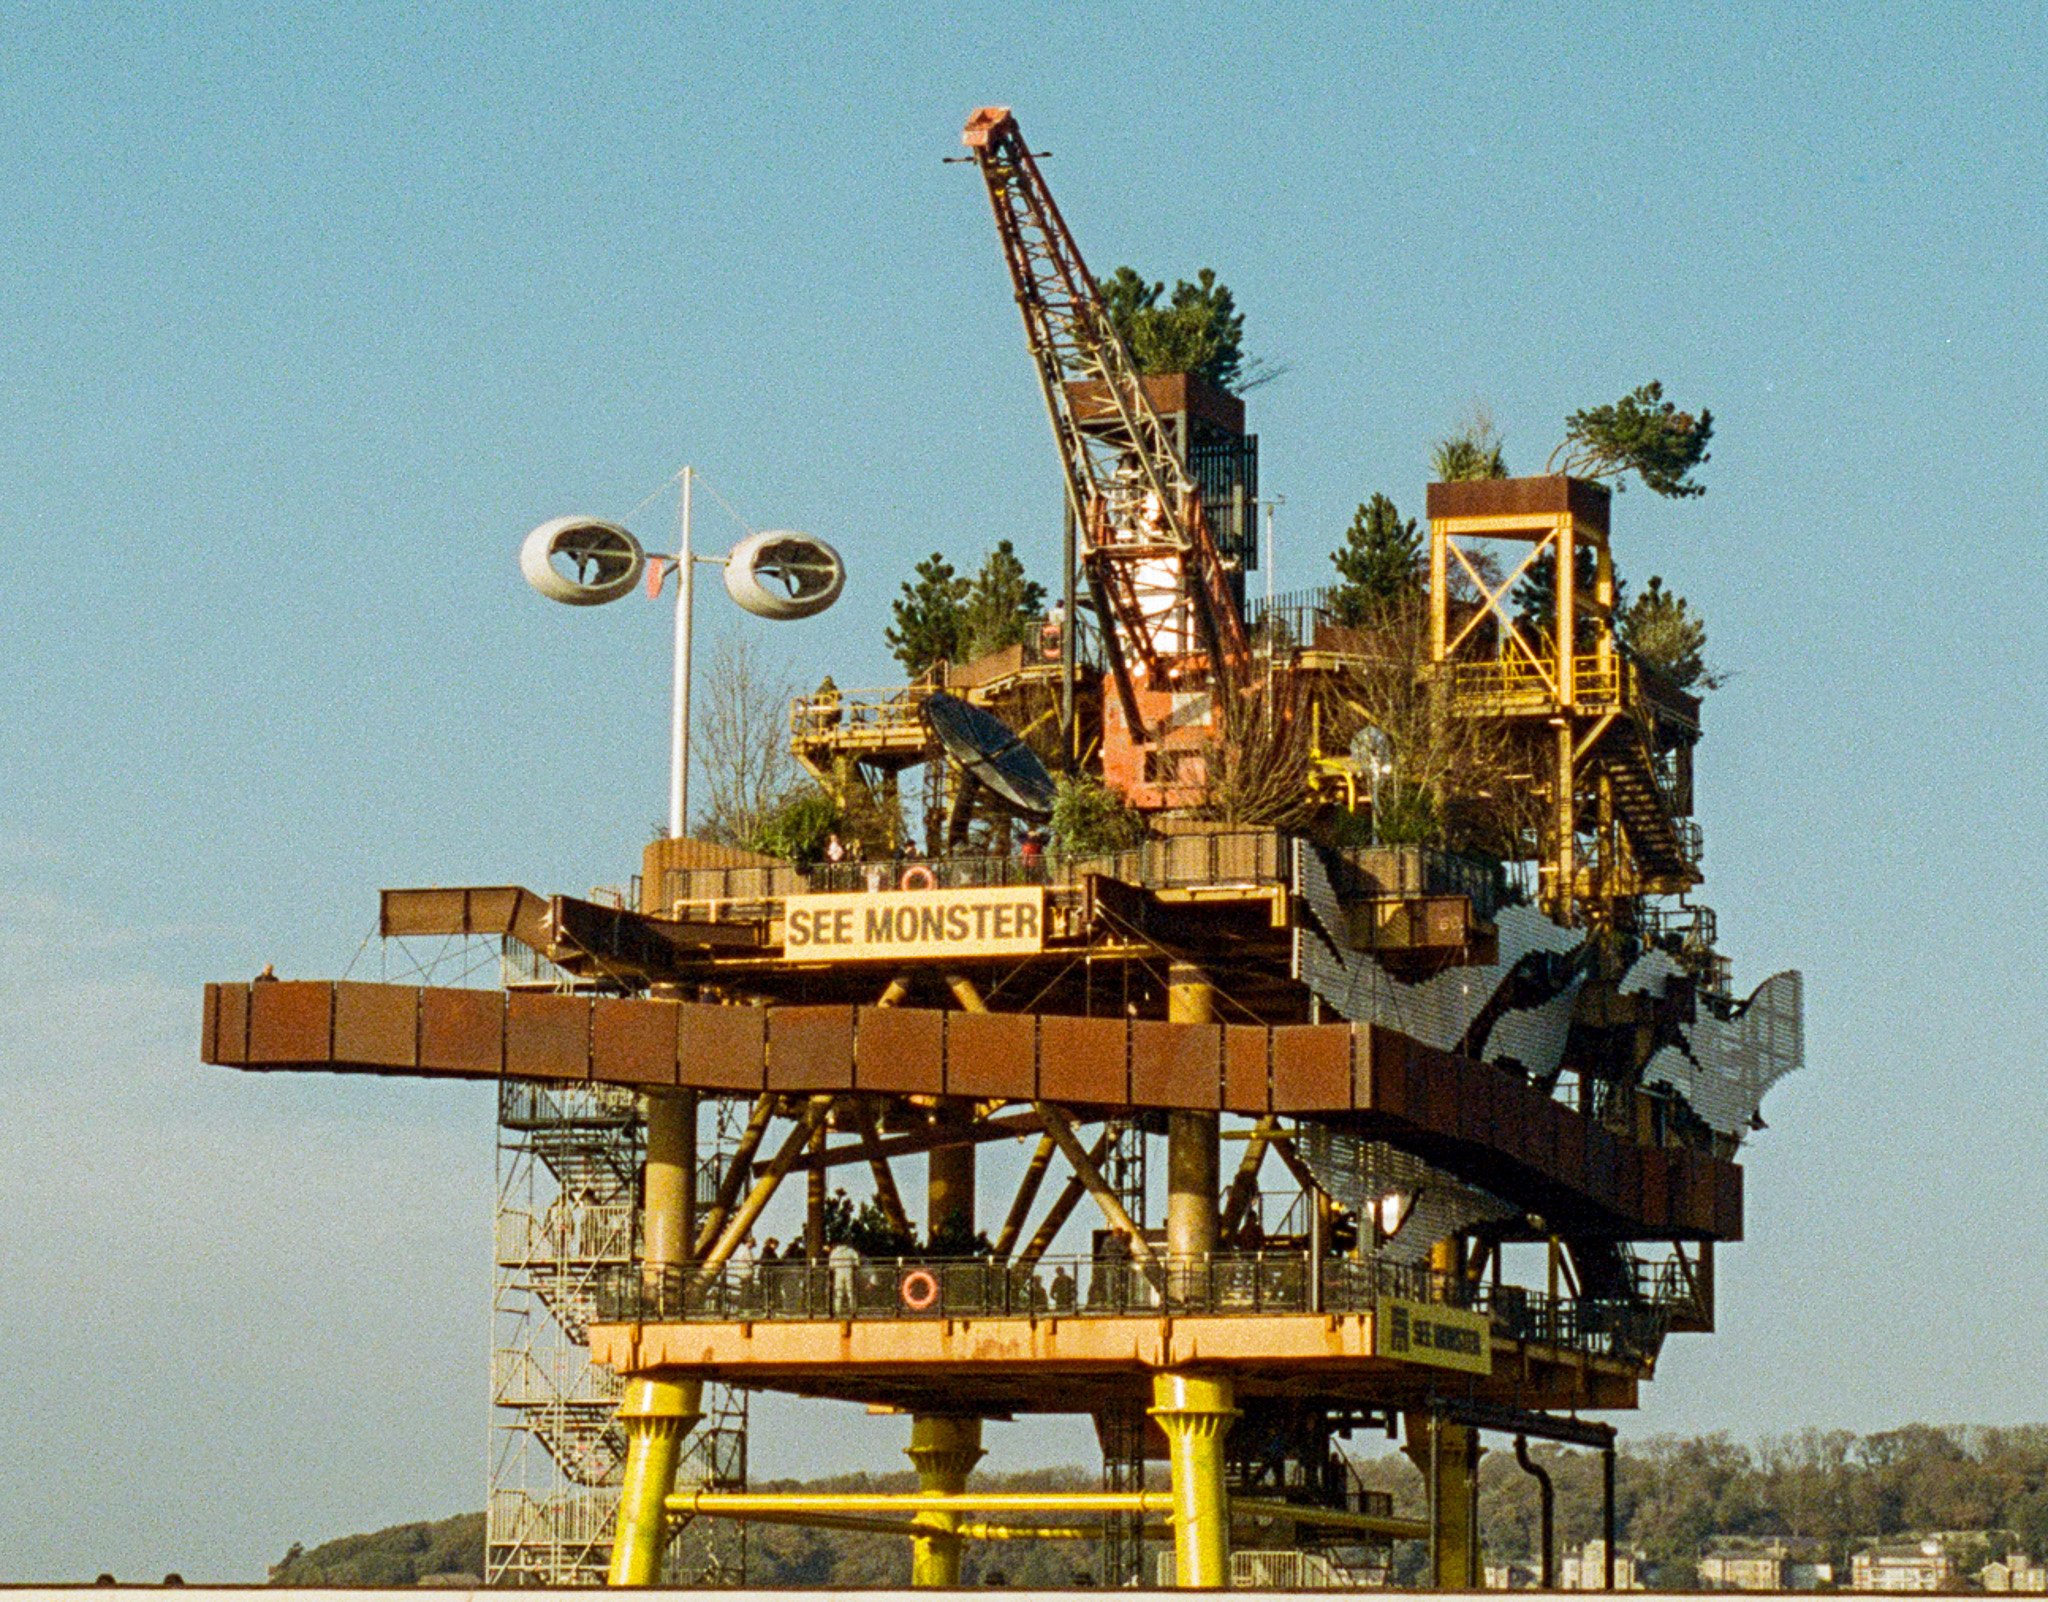
On Sunday, I had a few shots left on the iiic and wanted to get the films (all three of them) off to SilverPan Film lab for processing, first thing on Monday morning. So, a trip to Weston-Super-Mare to see the ‘See Monster’ and take a walk on the cold / wet beach. British beaches make for great photo locations at any time of the year and have previously provided me with much inspiration for project work.
I didn’t have much film left, so wasn’t able to take many shots with the iiic, but I got a few.
Leica iiic / Kodak Portra 400 / 5cm f3.5 Elmar


What have I learned?
I live and work in a modern world of cutting-edge technology, much of which is useful, a lot of which is a digital distraction. Life is so fast paced and moving so quickly that at times it’s very hard to slow yourself down, take stock and be properly in the moment.
As a photographer, I take a lot of pictures and really enjoy my mechanical cameras with manual focus lenses. However, as I mostly shoot digital, I get the instant gratification of seeing the results straight away. Nice as this is, it’s also digital overload. It invariably puts me in the digital dark room (in front of my computer) for hours on end as I process and tweak my images. Just what I don’t need on top of a working day.
Photography is how I relax, it’s what I enjoy. Work is what I do to pay the bills. I enjoy it but I spend far too much time in front of a computer. Since the Pandemic, I have to do many more video conferences as well, adding further to the ‘screen time’.
The bit I really enjoy about photography, is taking and composing images, being out and about, taking it all in, through my lens and recording the moments.
I like to learn new things and find ways to improve my enjoyment of photography. Film makes you consider every shot because it’s relatively expensive and you only get 24 or 36 images on a roll of 35mm film which I don’t tend to waste.
This exercise taught me a few things which I will endeavour to learn from and change my approach for the better.
I am regularly frustrated with film in that I load up a roll (randomly) and then use part of it, parking the camera for ‘next time’ which may be several months away. This maybe because the film isn’t any good for what I want to shoot next, or because I didn’t really think about what I was going to shoot before heading out. This is a very bad habit and usually leads to more frustration down the line.
Photography is supposed to be fun. My lesson here is to go out with a roll loaded specifically for the occasion and light conditions and finish it by the end of the day or at least by the end of the shoot. My film camera should be empty unless I’m using it right?
I dropped my films into SilverPan Film Lab in Bristol first thing Monday morning as planned. Duncan is a really nice guy and does a great job. For the first time ever, I asked for digital scans as well as developed negatives. Normally I would do all my own scanning but it takes several hours to complete and I have to plan for when I’m going to be in the right place for long enough to do it.
The films were processed straight away and I had my TIFF scans soon after I got back from dropping them off which was amazing. A short while later I loaded the images into Lightroom for some quick tweaks. I decided to leave the colours pretty much as they came out to show off the film character rather than apply my preferred style that I would normally process my digital images to.
With Duncan doing the scans, I re-discovered a new love of shooting film and found a way to take the pain out of scanning the negs and cleaning up the images. This new approach, despite costing a bit more money, saves me a lot of time and allows me to enjoy the images much sooner but with sufficient delay to make it still feel worthwhile but with a reasonably quick gratification of my work.
With a new workflow and rules about choosing the right film and using it up each time, I’ve no excuse not to shoot more film. I’m not big on new-year resolutions, but I’m going to try and shoot film every month after this little project. I’ve already been thinking up some new projects.

A tale of four Nifty’s
A short review of four of Leica’s premium 50mm lenses.
This is a quick roundup of four of Leica's premium 50mm prime lenses. Three of them are manual focus M-mount lenses, the other is an auto-focus variant made specifically for the new SL2 cameras, using the L-Mount. The M lenses can be used on L-Mount cameras with an adapter, but the L-Mount lens can't be used on M-mount cameras as there are no electronic contacts to operate the aperture, or AF functions.

Left to right, the APO M f2, The Summilux M f1.4, The Noctilux M f0.95, and the 50 APO SL f2.
The 50mm focal length has for a long time been considered the 'standard' lens in the 35mm film world because it's field of view is close to how the human eye sees things. What this means in reality is that the perspective distortion is fairly minimal and things look normal, i.e. not stretched or compressed.
Camera kits of old used come with a few lenses. Wide, Standard and Telephoto usually. The standard was always a 50mm prime lens with a reasonably wide aperture, typically f2.8 or larger.
All manufactures offer 50mm lens upgrades with apertures of f2.0, f1.8 or for a bit more cash f1.4. Canon's 50mm f1.8 was where I first heard the term 'Nifty Fifty'. Aside from being an excellent lens, it only used to cost around £79.00 which was a bargain. Most self respecting photographers have at least one fast prime lens in their kit bag. A prime lens has a single focal length such as 50mm.
It's worth noting at this point, that some people consider 35mm lenses as the new ‘standard’. Being a little wider, they are slightly more 'universal' than 50mm so I can understand why this came about.
A fast prime lens opens the door to much creativity with improved low-light capability and the option to use narrow depth of field when shot wide-open producing the effect known as 'Bokeh' (pronounced Bow-ka, or Bow-kay as you prefer). It describes the buttery smooth out of focus areas typically in front of, or behind the subject when using a wide aperture.
If I could, I would shoot only 50mm lenses. It's been a long term favourite focal length of mine but it's not really universal for all photography so doing so would severely limit what I could photograph. For this reason, I drop to 35mm or wider, or use a telephoto as required depending on what I’m photographing.
50mm does however suit much of my photography, so and unlike other focal lengths, I've got a few favourites, with specific traits and character.
By way of a short review this article looks at four of Leica's premium 50mm lenses side-by-side and is a very concise summary of what I personally like, or dislike about each. I share my thoughts on using them and with a simple table, award points for different features which hopefully may help in your decision making. Thanks to Tom at Leica Camera Exchange, Bristol for loaning me some of the kit for this comparison.
Leica 50mm Summilux M - f1.4
Considered as a fast 'upgrade' to the legendary Summicron f2 which in itself is the reference 50mm lens by which other manufacturers judge optical performance. The 50mm Summilux is known as the 'King of Bokeh' to many. It is sharp and small / light enough to travel with. It's a brilliant, do everything lens with incredible low-light performance, fantastic contrast, nice colours and render. Being physically slightly longer than the Summicron, it blocks the optical view finder a little, especially if you use the built in lens hood but not so much as to cause a huge problem framing shots. I purchased a used example a few years ago and it's the one lens I don't think I could ever sell. It's more expensive than the 50mm Summicron but it's the least expensive of these four premium 50's. It's also fairly readily available on the used market for a relatively good price. Quite possibly, the only 50mm lens you'll ever need and highly recommended.
Leica 50mm APO Summicron M - f2.0
At the time of writing, this is Leica's newest 50mm M lens. A substantial upgrade in optical performance to the legendary 50mm Summicron M, which is already known as a reference lens. Being a Summicron this APO version still has an f2.0 maximum aperture. Some would say this is the best 50mm lens ever made for the M. It boasts MTF curves that are more or less flat, in short it's optically perfect. Razor sharp right out to the edges at all apertures, perfect colour reproduction and virtually no chromatic aberrations. The smallest of all lenses on test here, very light and doesn't block the optical view finder on the M cameras. This lens is very difficult to make and therefore very expensive, second only in this review to the Noctilux M. It is a delight to use, but not as fast or artistic as the Summilux the images of which I personally prefer. Being quite a recent lens, and being so hard to make, it is rare to see them on the used market and command high-prices when they appear. On the newer higher mega-pixel M cameras, this lens will help to resolve even more detail in your shots than ever seen before but if it’s creativity you’re looking for you might want to read on. Whilst this lens is capable of taking stunning images, it lacks the creative depth of field available on some of the other lenses. That said, the bokeh effect is very beautiful and buttery smooth, just not as deep as the other lenses. If they ever do a ‘close-focus’ version of this lens like they did with the 35mm APO, it’ll be a game changer for M cameras.
Leica 50mm Noctilux M - f0.95
In 2008 when this lens was first launched, Leica were pushing the absolute limits of what was possible and trying to prove an engineering point. For an M lens, it's large and heavy and blocks a good portion of the optical view finder on an M camera. Oddly it feels better balanced on the SL platform and the SL's electronic viewfinder will help considerably to tame the super-narrow depth of field and nail focus every time. As you might expect, it's a low-light and bokeh monster with it's very own unique look. It's sharp too, but not as tack sharp as the other lenses in this test. It can however isolate subjects from both the foreground and the background in a way normally associated with telephoto lenses and produce some of the most dreamy 3D like effects you'll ever see taken with an M camera for a very unique look. It's quite possible to focus with the rangefinder even wide open but undeniably easier with the help of the optional electronic viewfinder on an M camera, or the fantastic EVF on the SL cameras. Like the APO M, It's very difficult to make, and unsurprisingly the most expensive lens in this test. It's the fastest lens in the current Leica lens line up and you don't see many of these in the used market. When they do come up, they hold very good money. Many will consider this lens over the top and a bit of an indulgence but driven properly (and it does take some understanding to get the best out of it), it produces some quite unique and amazing photos with a 3D-like render that will stand out from other images and do things no other 50mm lens can. Whilst I say this is a large lens, all things are relative. Compared most AF lenses it’s actually not that large at all. It’s even smaller than the APO primes of any focal length on the Leica SL.
Leica 50mm APO SL - f2.0
Unlike all the other lenses in this test, this was designed for the SL platform and uses an L-mount, so it’s not usable on an M-mount camera. This lens has been called the best 50mm lens ever made. Personally, I think it's even more superior in performance to the M version because it has all the sharpness, colour, contrast and optical performance as the APO M, possibly even more, but also allows close focus down to 30cm which produces some of the most buttery smooth bokeh effects of all the lenses. It's a brilliant lens for product shots because you can easily frame even small objects and capture incredible detail full frame. Being larger than the M version, is easier to make which is also reflected in the price. It is much less expensive than the APO M, but costs a little more than the Summilux M. It is readily available on the used market for similar money to a used Summilux M and very well balanced on the SL being a much smaller in form factor than any of the Leica SL zoom lenses. It's IP54 rated, so completely weather sealed and as rugged as the SL camera itself. The build quality is outstanding with smooth manual focus which despite being fly-by-wire, is the best non-mechanical manual focus I've ever used. The manual focus is configurable for 'throw' and linearity on the camera allowing you to customise to your own needs. There is a Summilux version of this lens, available for much the same money, but it's very large and heavy. I'm sure the performance is staggeringly good but it’s as large as some of the SL zooms, a form factor that I don’t enjoy using simply because of their size.
——————————————————
In an effort to make a comparison between these four fabulous lenses, I’ve put together some tables, scoring each lens against some standard criteria that’s important to me. Scores in each category are from 1 (poor) to 5 (exceptional). To support these scores, I spent a full day just testing all four lenses shooting the same scenes with each lens. For the tests, I used a Leica SL2-S full frame digital camera running 24 mega pixels and a Leica M11 rangefinder M series camera running 60 mega pixels.
I shot a series of photos with each lens deliberately designed to address each category including some very tricky images designed to trip the lenses up and provoke some bad behaviour like purple fringing in high-contrast areas.
In this review, I’ve deliberately avoided technical detail about these lenses. Enthusiasts will be well aware of the technical merits for each lens and there are plenty of data sheets available from Leica. Furthermore, there are a ton detailed reviews for all the nerds out there. From my perspective, images are very personal and I judge lens or camera performance on how the final result makes me feel. All comments and opinions are based on my personal opinion only. I’ve never seen these four lenses up against each other so I thought it would be interesting to compare them.

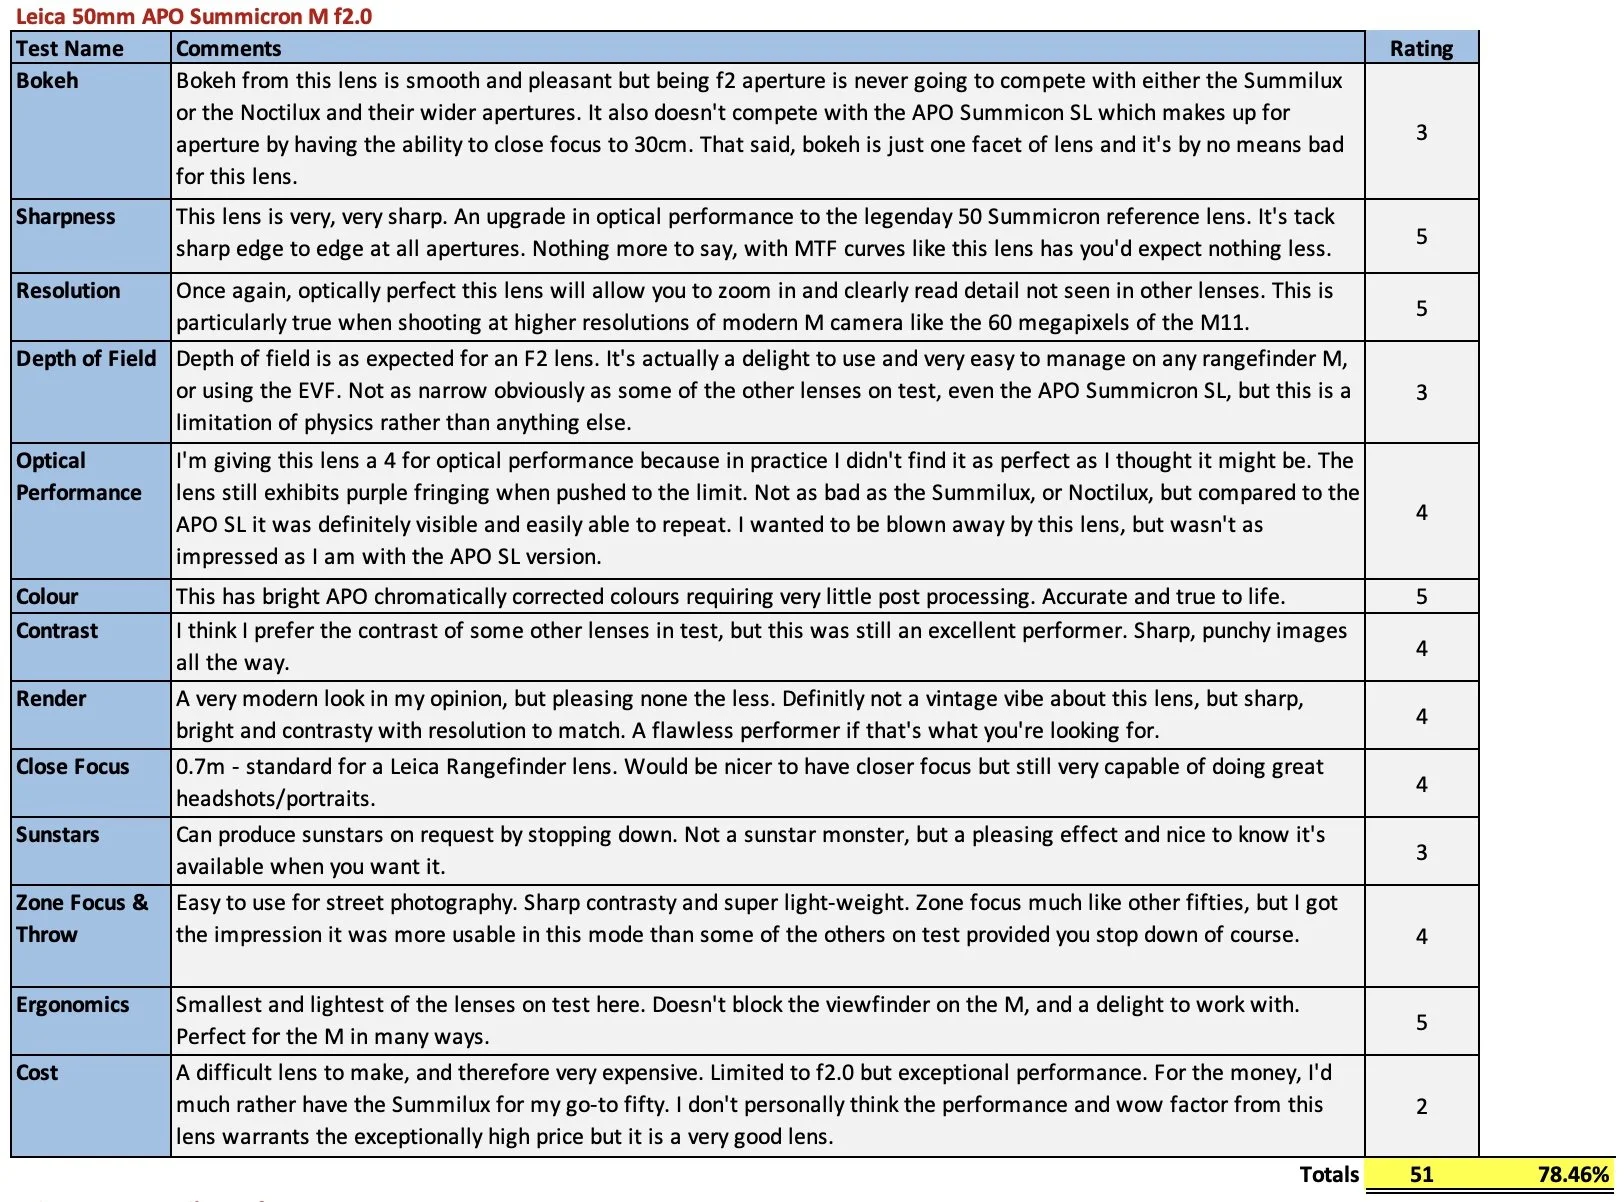

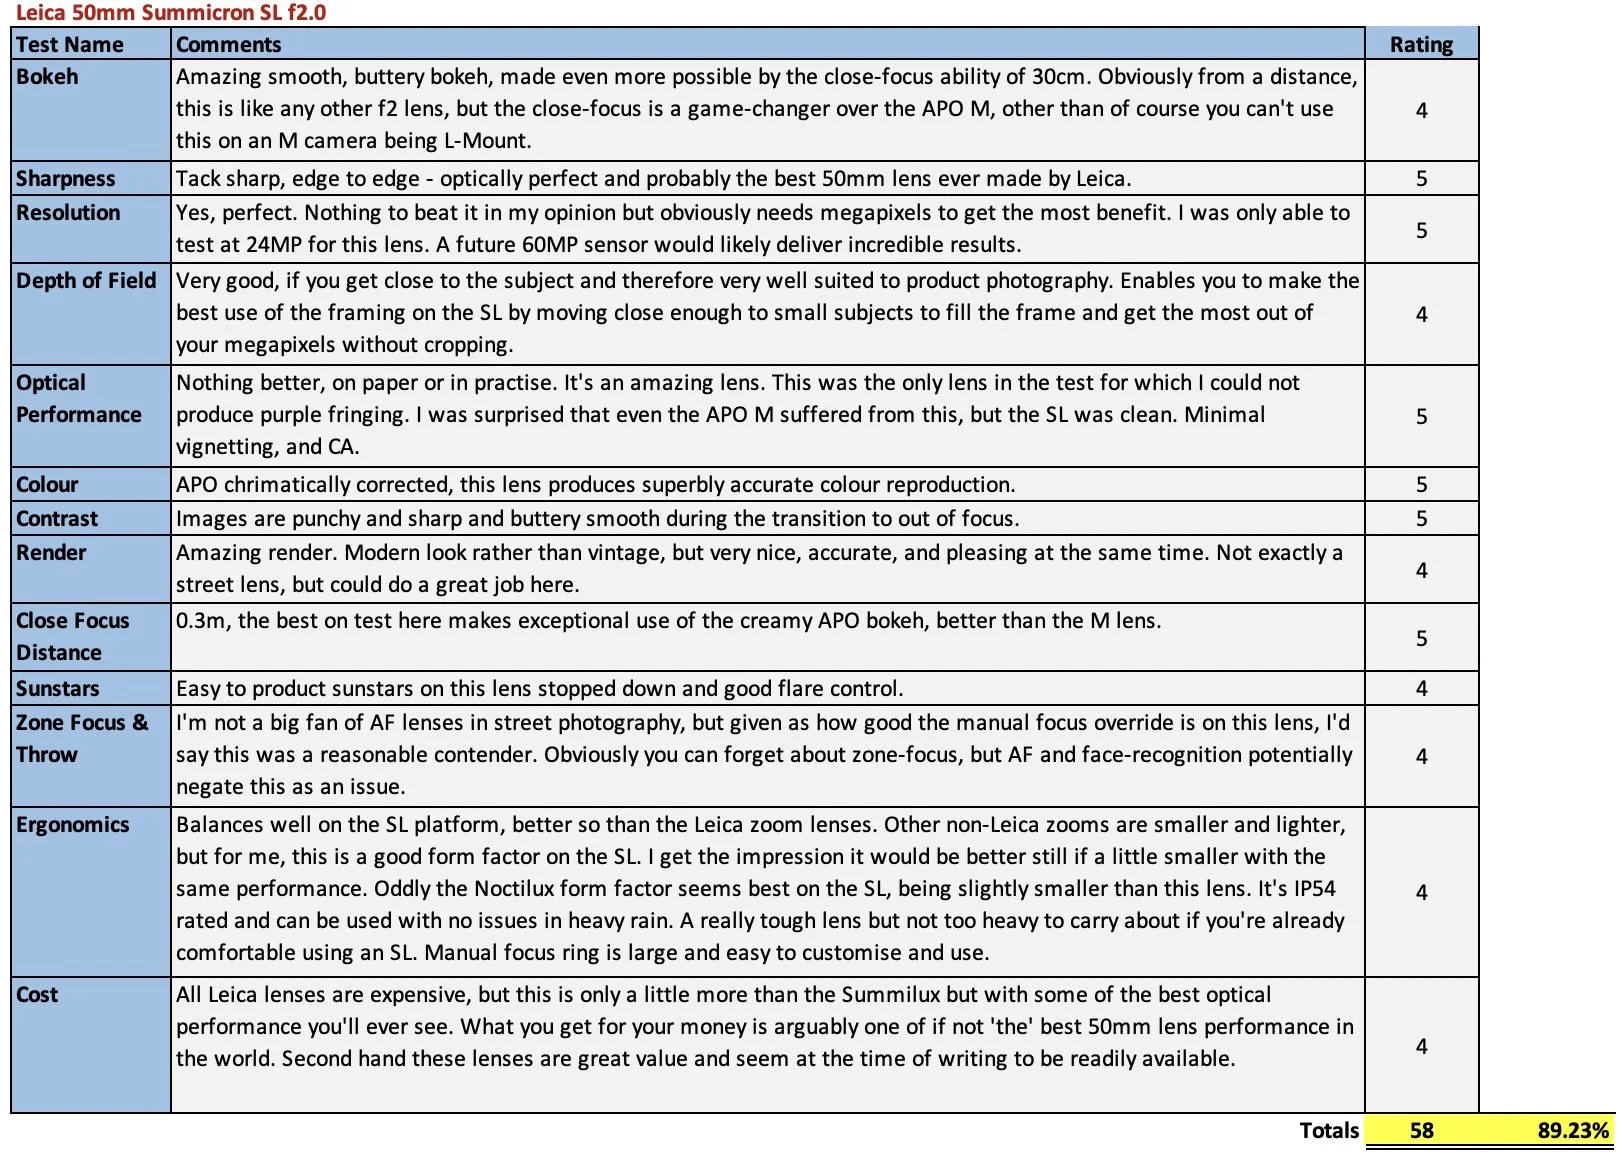
From the above, you can see that I rate the 50mm APO SL the highest. It’s really quite an exceptional lens and has extraordinary performance. It is however only usable on an L-Mount camera so no good for ‘M’ shooters.
You would therefore expect the APO M to be second on my list and when I started the test, I also thought this would be the case. The fact is, I was able to find fault with the optical performance that didn’t appear on the SL version, such as purple fringing which really surprised me. It was not as obvious as the Summilux or even worse the Noctilux but the SL version didn’t exhibit this trait at all. Whilst images were crisp and sharp and the bokeh smooth and buttery, I was able to push this to extremes on the SL version because of the ability to close focus.
So, second choice was the legendary Summilux M f1.4. Actually it’s first choice for the M. You simply can’t go wrong with this lens in my opinion. It does everything really well. It doesn’t have quite the staggering optical performance of the APO M, but value for money and its incredible bokeh make it a clear winner as far as I’m concerned.
So last on the list is the Noctilux. Don’t get me wrong, this is an absolutely fabulous lens and I really enjoy using it. The images really are quite unique and give an appearance which is classically Noctilux, a category in it’s own right. What puts this lens in last place is primarily the price of owning one, the minimum focussing distance of 1m and finally the optical performance in general. If it could replace all of your other 50mm lenses and be the universal choice, it would score higher, but the fact is, it’s heavy, blocks the viewfinder and shot wide open, you need to be careful of purple fringing. 1m minimum focus is going to limit you on some shots and the fact that you can buy a car for the price of this lens seals it’s score. But, if you can afford it and have another 50mm lens in your bag to use where you can’t, or won’t take the Noctilux, then it is a creative photographers dream and will give many of your pictures the creative edge, unachievable without this lens.
Personally, I love the Noctilux for what it can do. When I’m struggling for inspiration on the street, I put the Noctilux on my camera and shoot wide open. It can turn the most mundane scene into a work of art. I’ve not seen or been able to recreate the Noctilux effect on any other lens. More recently, I’ve been using this lens with my 1967 M4 film camera. I’m able to produce dreamy portraits with all the character of film. I’m also still able to use it successfully with the range-finder of this 56 year old camera.
I shot hundreds of images with these four lenses and this article will run on and on if I include in-depth comparisons between all of them for every test. I will attempt to include a cross section of highlights and lowlights.

Test 1 - Purple Fringing and sharpness all shots wide open for each lens. APO SL is clearly the best performer showing no purple fringing and is the sharpest. Summilux M shows the next cleanest image with regards purple fringing, but clearly not as sharp as either of the APO lenses. The APO M, is sharp, but suffers some purple fringing. Noctilux has the most purple fringing and is the least sharp of all four lenses.
Test 2 - Subject Isolation & Bokeh plus colour, contrast & vignetting. All lenses shot wide open from a tripod mounted SL2-S approx 2-3 metres from the subject.

50mm APO SL - Brilliantly accurate, optically perfect and very pleasing bokeh.

50mm APO M - Also brilliantly accurate, a little more contrasty than the SL minor vignetting.

50mm Summilux M - A bit more vignetting and more bokeh effect from the wider f1.4 aperture.
50mm Noctilux M - More contrasty than the summilux, has the most vignetting and best most creamy bokeh of all the lenses at f0.95.
50mm APO Summicron SL - What’s it for?

50 APO SL - a brilliant lens for the professional photographer. It’s crazy sharp, accurate and produces superb images whether landscapes, portraits, product shots or anything in between.

Close focus on the APO SL means you can always fill the frame - brilliant for product shots, sharp accurate and pleasing on the eye.
Summilux M f1.4 - What’s it for?

The Summilux M is a brilliant lens. It’s sharp, gives a good deal of 3D pop, great bokeh and is the best value of these four premium lenses. Of the bunch, it makes the most sense as the go-to, universal Nifty Fifty.

The Summilux earned a reputation as the king of bokeh. Very easy to blur backgrounds. Colours are very pleasing it gives great contrast. Awesome for all sorts of portraits.
50mm APO M - What’s it for?

The APO M is the smallest of the bunch, is a delight to shoot and fits perfectly on any M camera. It’s super sharp and accurate, like the APO SL and has smooth bokeh though not quite as much as the Summilux at f1.4. It could be your only 50mm lens, but it’s very expensive and not quite as creative as the others on test.

The APO M is great for portraits including creamy smooth bokeh effects and razor sharp where it counts. Colours are accurate and punchy.
Noctilux M f0.95 - What’s it for?

The Noctilux at f0.95 allows subject isolation like a telephoto lens and is able to blur foreground and background to create an almost 3D effect. It has good contrast and excels in black and white. It’s not a universal lens because it’s not as sharp as the others and produces an annoying purple fringing in some high contrast situations when wide open but used well and understood, it can create some very unique imagery.

The noctilux is rich in Leica Magic, sharp when you need it to be, beautiful colours, high contrast and a render which is quite unique among Leica lenses. It is however quite large on an M camera, blocks the viewfinder quite badly and of course is very expensive.

Sunny-16, Zone Focus & Street Photography
Tips & Tricks for Manual Photography
Taking pictures is as popular today as it's always been, quite possibly more so with the upsurge in social media. Most people are happy with using smartphones day to day but there will always be a more serious or enthusiastic bunch who prefer to use an actual camera.
Most people will be using modern digital cameras, either DSLR or Mirrorless type. Manufacturers seem to be favouring smaller, mirrorless types at the moment with high-resolution CMOS sensors. A few will be using 35mm film cameras, most of which will be quite old. With a recent awakening to all things 'retro', people are dusting off their old film cameras. I regularly see students wandering around Bristol, shooting film and enjoying old-school photography which is nice.
I really enjoy back to basics, manual photography which is why I use Leica rangefinder cameras and manual focus, prime lenses. I'd be lying if I didn't admit to being slightly 'irked' by the way modern smartphones are practically 'weaponised' with camera technology. I rarely if ever use my phone camera, but I do accept that there is a justifiable link between your camera and your smartphone. Hold that thought for a moment.
One thing we don't have to worry about anymore is getting the right exposure for our pictures. Long since automated in our digital cameras and managed flawlessly on smartphones.
Who thinks about calculating the right exposure when taking a picture these days? If they do, there are even fewer who do this before even aiming the camera?
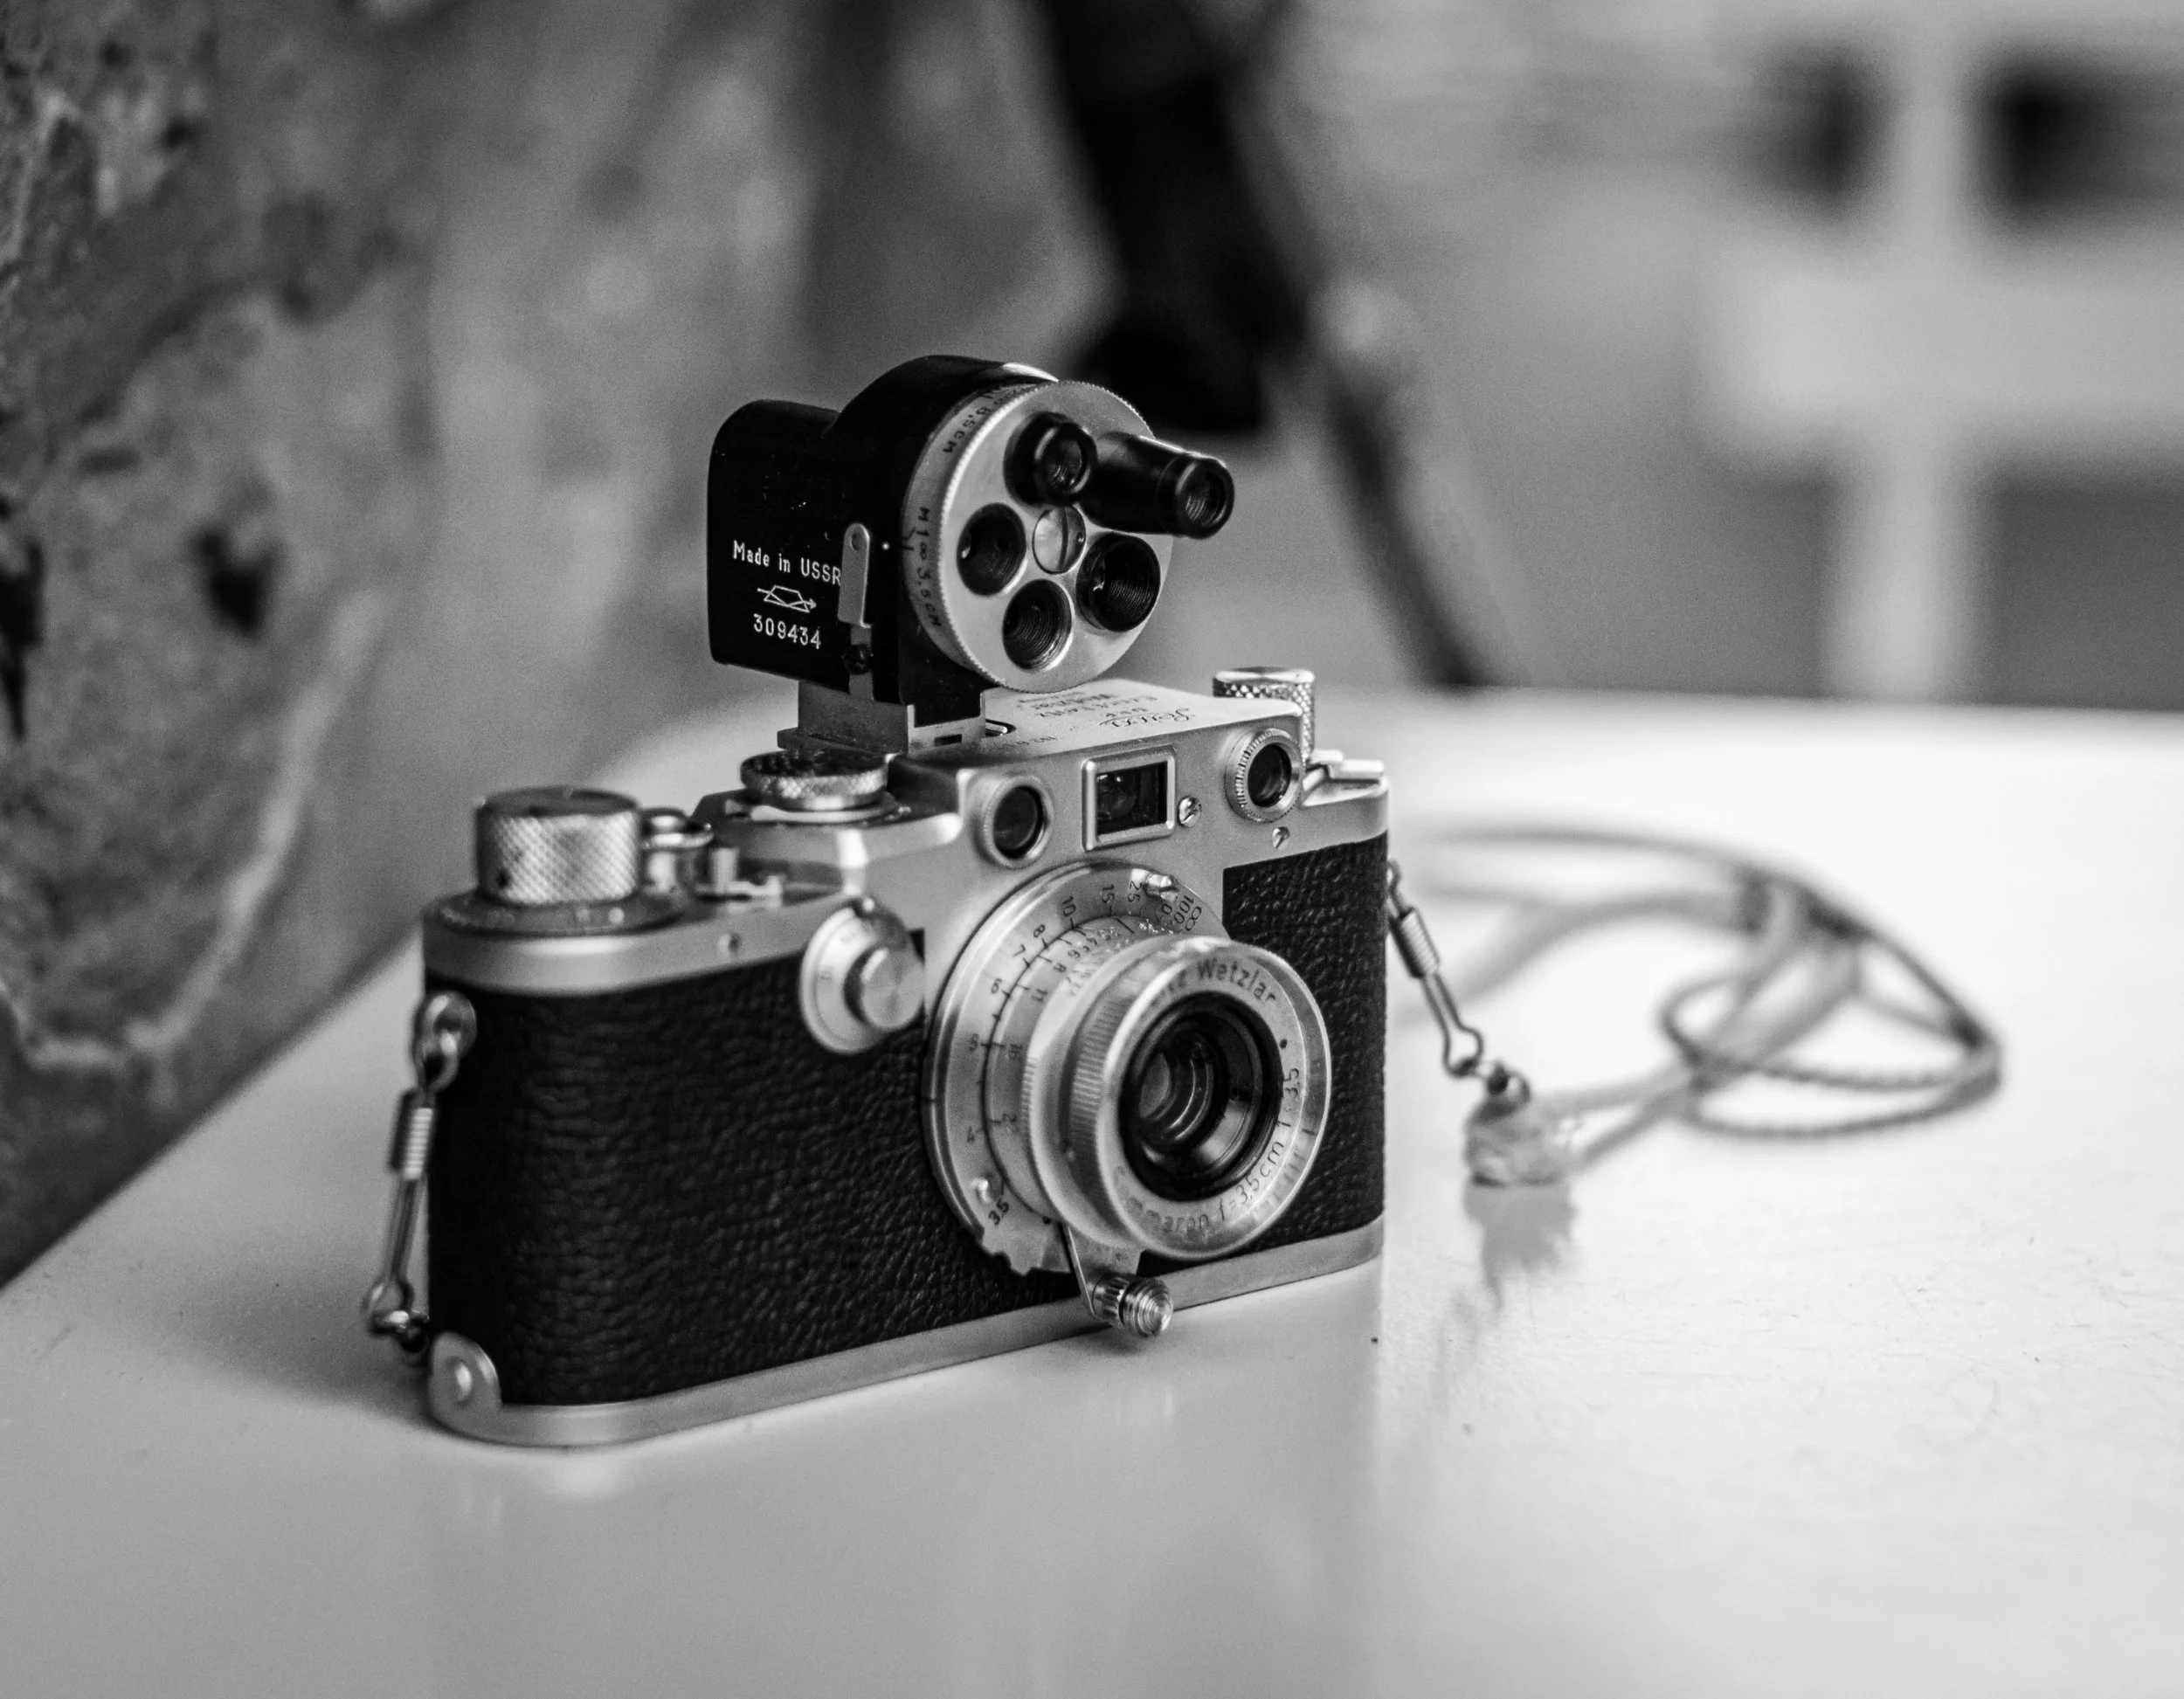
Well, you might think differently if you ever use an old film camera, especially if it doesn't have a light meter. Perhaps it does have one but is being very old, doesn't work very well, or at all. Such was the case when fell in love with a 1967 Silver Leica M4 in the shop window of LCE Bristol.

My 1967 Leica M4 fitted with a 40mm f2 Summicron - No light meter, No worries !
The M4 doesn't have a built-in light meter. You can of course use it with an external hand-held meter. Leica make beautiful cameras but in my opinion also have a history of ugly, but practical, bolt on accessories. Case in point, this camera came with a bolt on selenium powered 'Leicameter'. A hideous looking contraption which attaches to the top of the camera and engages with the shutter control dial.
I love the form factor of the M4, just as it is, perfect. It looks and feels very familiar being an 'M' model, robust, mechanical and well-made but lighter than my digital M’s. However, that awful contraption on the top just wasn't doing it for me and had to come off straight away, it never even left the shop with me as I could never imagine wanting to use it. I'd read up using the M4, watched a few YouTube videos and learned of the 'Sunny-16' rule which came highly recommended. It sounded like the answer to all my problems and the way to enjoy my film camera.
Sunny-16 is just a simple rule set, derived back in the days of film which sets out how to expose correctly for any condition. The rule still works today and is brilliantly useful.
The rule simply states:
In bright sunny conditions with hard shadows, with your aperture set to f16, your shutter speed will be the reciprocal of your film speed (or ISO setting).
So, if you’re using 400 speed film, or ISO400 on a digital camera, your shutter speed will be 1/400s.
For the observant among you, many old cameras (including the M4) don’t have 1/400s selectable on the shutter speed dial. They do have 1/500s though which is actually close enough. Film is more forgiving than digital for getting the exposure slightly out, and this really is, close enough despite being seemingly 25% over the ideal value.
But what if it’s not sunny? … the rule continues:
If it’s mildly overcast and shadows are visible but with soft edges, use f11.
If it’s overcast and there are virtually no visible shadows, then use f8
If it’s heavy overcast with no shadows at all, then use f5.6.
For open shade or sunsets with long shadows then use f4.
The rule also states that for the other extreme if you’re in snow or sand and it’s sunny, use f22.
There are lots of tables available to download from the internet. I created one of my own and carried it about for a while in my note book.

My Sunny-16 reference table.
Once you have your base setting locked in, you can easily extrapolate for the aperture you want to use for creative effect. It's a simple matter of compensating shutter speed to keep the same exposure. If you come down one stop from f16 to f11, then double your shutter speed to go up one stop to keep the same exposure. If you come down to f8, go up two stops in shutter speed.
Here is a little reminder about exposure:
On the camera, there are just three things you can alter to adjust the exposure. For each item values are shown in 1-stop increments.
Film speed/ISO
100, 200, 400, 800, 1600, 3200, 6400 and so on.
Shutter speed
1/30s, 1/60s, 1/125s, 1/250s, 1/500s, 1/1000s and so on.
Aperture size
f1.4, f2, f2.8, f4, f5.6, f8, f16, f22.
On film, the speed is determined by the chemistry and therefore is fixed and can’t be changed. On modern cameras, ISO adjustment is available from a menu, or rotary control and typically ranges from 50 to 25000 or higher.
ISO speed is the equivalent of film speed and makes the sensor more or less responsive to light with the same advantages or disadvantages as film (increased noise or grain with higher speed value). Of course modern sensors produce far less noise now, meaning higher, useable ISO speeds make shooting in lower light even easier without the need for flash.
Shooting film is sadly, no longer a 'cheap hobby' and on my first outing with the M4, I was concerned about wasting film, processing and a lot of time if I messed up my exposures. To hedge my bets, I took along a handheld light meter and a digital camera with a screen that I could use to check the settings. I also downloaded the 'Light Meter' App onto my iPhone, which actually works a treat.
I wanted to be free from carrying all this extra paraphernalia about by working out exposure in my head but couldn't yet trust myself to use Sunny-16 reliably. However, with these safety nets, I could practise using the rule but be sure I was right. At first, this process was slow and cumbersome but probably saved me from some duff exposures.
My fears were soon allayed. On my first roll of film through the M4, all 36 images came out just fine. I was amazed, and obviously quite relieved. I was more relaxed after the next two rolls and had confidence to shoot without a light meter soon after that. I had my iPhone with me to check exposure if needed but quickly learned to work without it. I've shot many more rolls of film since and never yet missed an exposure so badly that I couldn’t recover it. This proved to me that Sunny-16 works.
The picture below was taken in Bristol using my Leica M4 with my first roll of Ilford HP5+ film. It was later featured in Leica Fotographie International and credited with the prestigeous 'Master Shot' award.
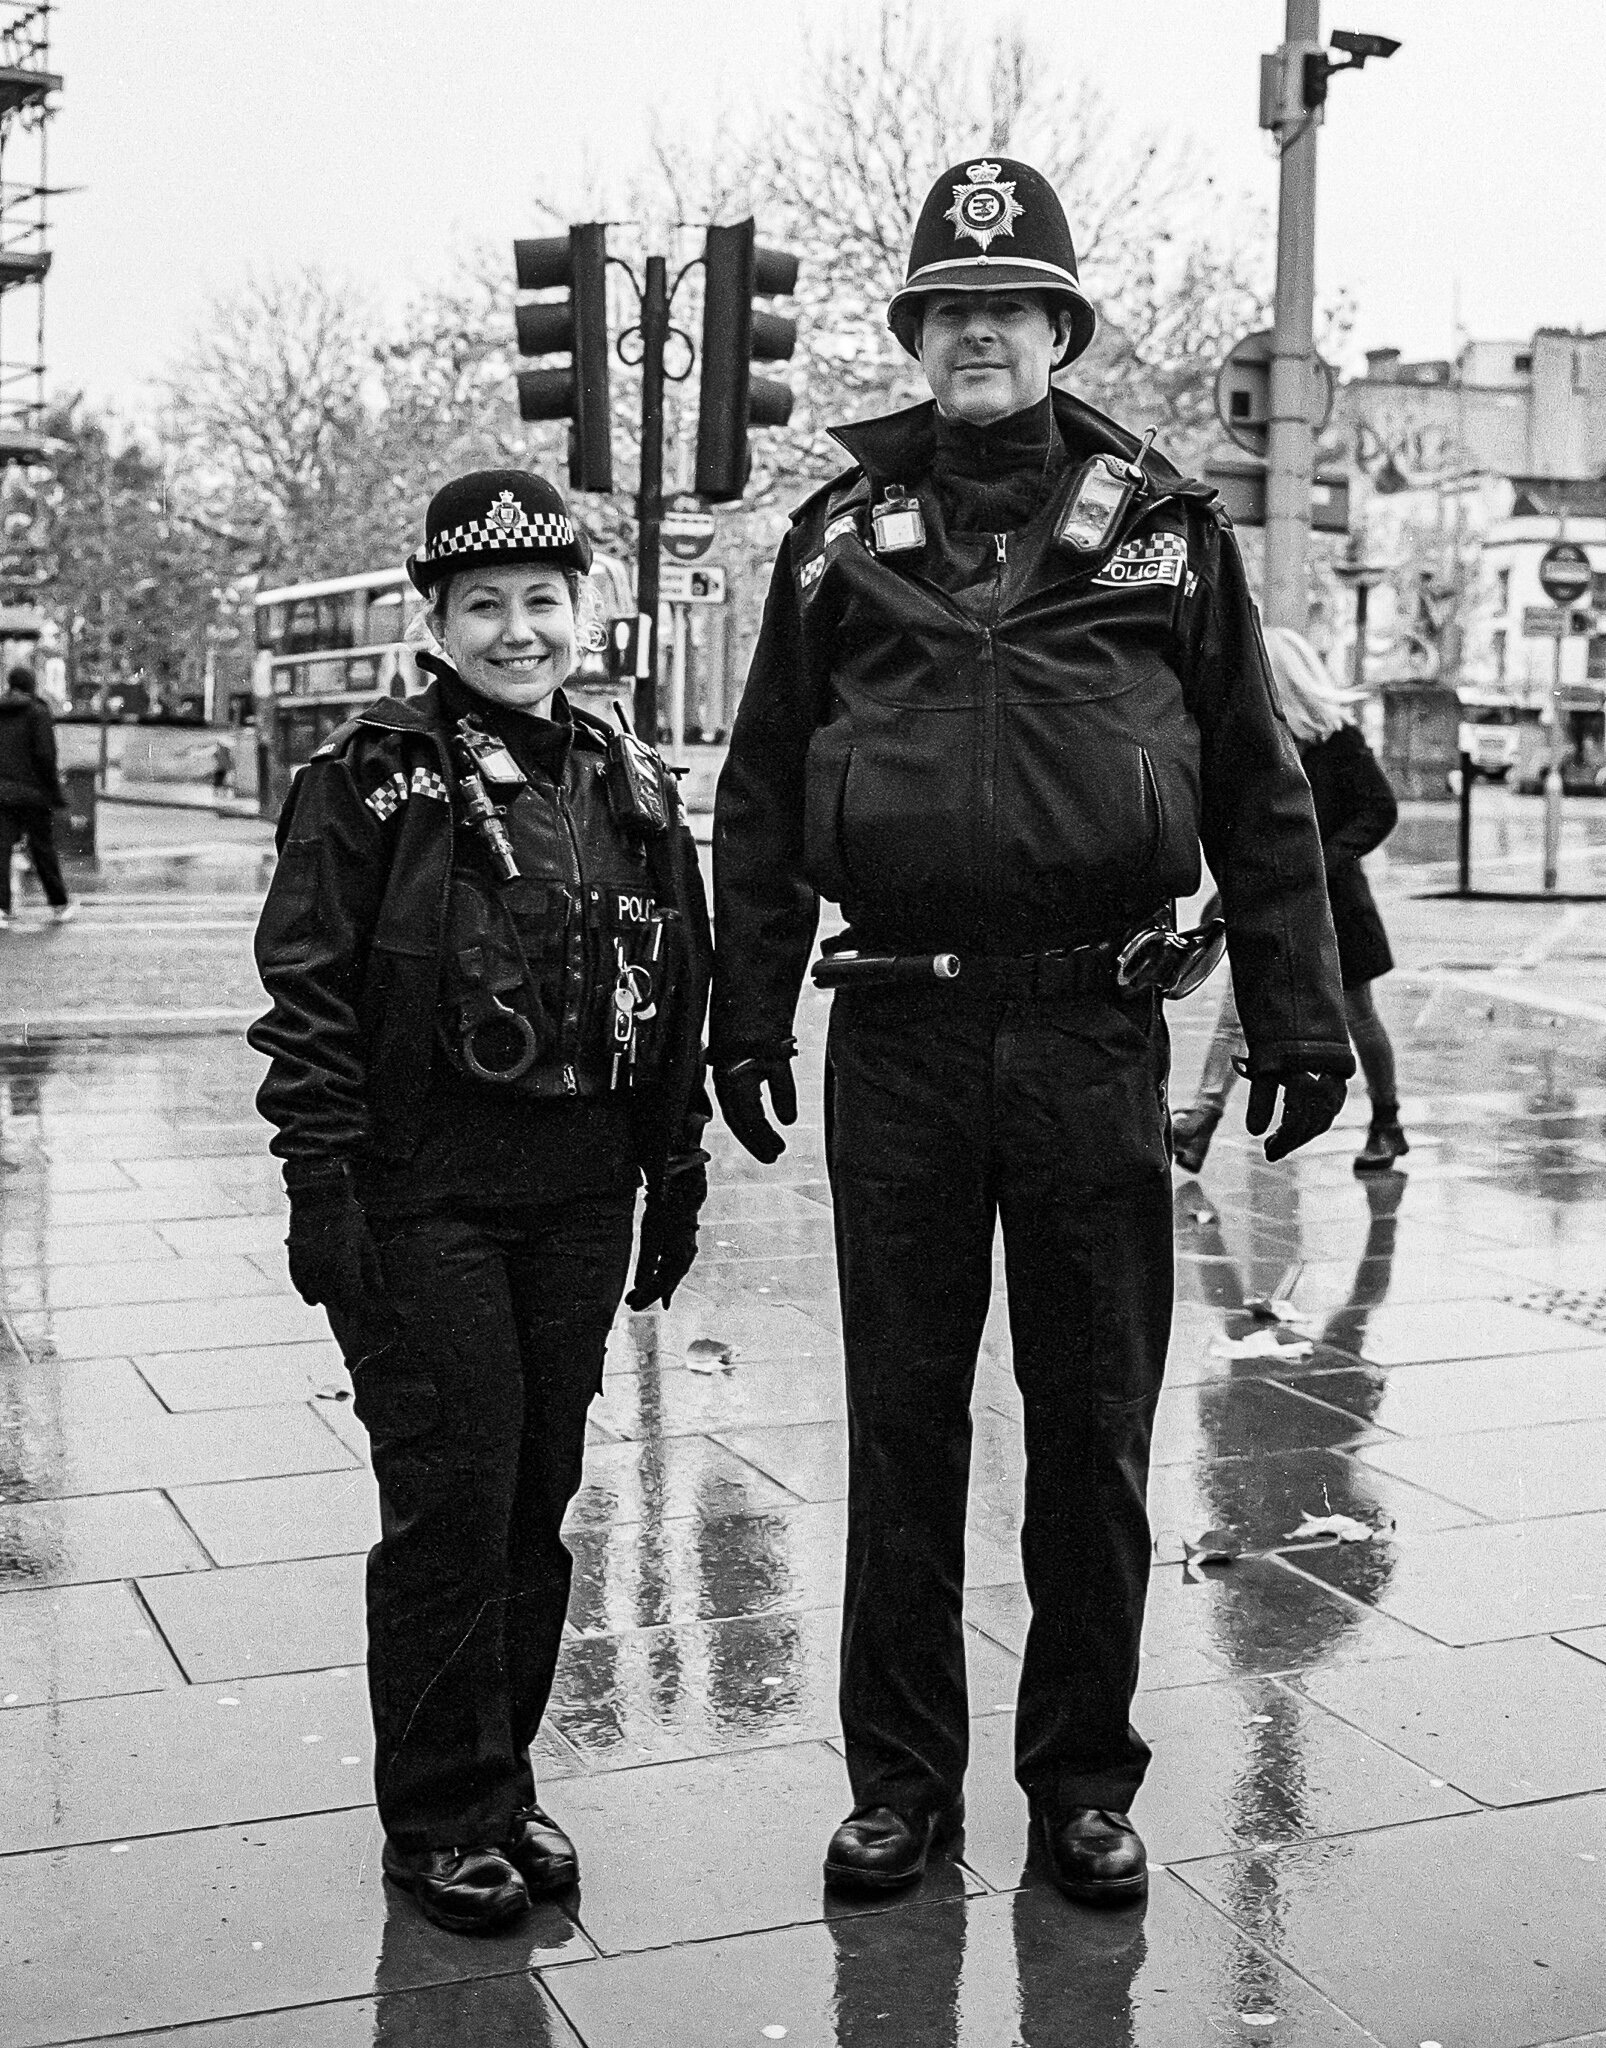
Friendly Bristol Cops, taken with my 1967 Leica M4 went on to win LFI, Master Shot Award.
Sunny-16 and Zone Focussing together:
Anyone who has attempted candid street photography particularly with a manual camera will likely be familiar with 'zone focussing'. This is manual, pre-focussing of the lens to capture people as they walk into a range (depth of field) say between 1.5 and 5m where everything is in sharp focus. The depth of field available is a factor of lens focal length and aperture (f-stop) selected. The higher the f-stop number, the smaller the aperture but the greater the depth of field.
28mm and 35mm lenses typically provide good depth of field at useable apertures, (f5.6 or f8). For that reason they are perfect for candid street photography. Lenses are usually marked up with DOF scales, indicating the start and finish distance of the depth of field for a given aperture. The picture below shows the markings on my 28mm lens. With f5.6 selected, the depth of field available is 1.5 to 5m, or 5 to 15 feet. Whether you're metric or imperial, this is very easy to judge. Shooting from the hip, or without holding the camera up to one's eye, it's easy to frame people at this distance and get them in focus. You've just turned your rangefinder into a literal 'point-and-shoot' camera.

With focussing taken care of you have to pre-expose the image too. Auto shutter speed is quite unreliable in street photography with ever changing light conditions, or subjects in and out of shade.
Film is however pretty forgiving and even in digital, working with RAW format files, you have software exposure adjustment / recovery of around +/- 4 stops giving a lot of leeway for error. It is nice however to be close when taking the photo and definitely gives the best results with minimal required adjustments.
Consider this? What if, just by looking around as I’m walking with my camera, I could know instinctively what shutter speed to select for the aperture I’m using?
If it’s candid street shooting I’m doing, the chances are I’m going to be shooting f5.6 or f8 and 28mm or 35mm. Well it turns out the Sunny-16 rule allows me to do just that and it works as well for digital photography as it does for film.
Over time and with more confidence, I’ve added some extra bits of information to the table depending on where the light is coming from. These days I carry the table around in my head.
If the subject is side-lit, you may want to increase the exposure by +1 stop.
If the subject is back-lit, you may want to consider increasing by +2 stops.
If shooting indoors, then best not to let your shutter speed drop much below 1/60s, or if you’ve got a steady hand, 1/30s and you’ll probably be wanting to shoot at f2.8 or wider. Indoors you'll want a fast film, ASA400 or 800. For digital I'd recommend using ISO800 or above.
For a white subject, you may want to reduce exposure (-1 stop). For a dark or black object, use over expose by +1 stop.
Will these skills make you a better photographer? Absolutely, give it a try, it’s fun and quite addictive. Try it first using your digital camera so see how you get on.
It takes a little time to master sunny 16 but with practise youn be using it reliably.

Leica Pourquoi?
A journey back to the real art of photography

This is not a review about Leica equipment, nor will I attempt to discuss in any detail, technical specifications. The enjoyment of using a camera and learning how to get the best out of it, is as important to me as the images that I create. This is a story about how I settled on using Leica rangefinder cameras and a small selection of high-quality prime lenses for all of my photography and the journey that lead me there.
I'm not interested in brand snobbery, though I do believe that a manufacturer usually knows best about matching its own lenses and cameras to get the best results. Of course you can mix and match aftermarket, or alternative brands and it's fun to experiment with vintage lenses, there are no rules here. For all my serious work, I've used Canon lenses with Canon cameras, Nikon lenses with Nikon cameras and Leica lenses with Leica camera. I'm not shutting out other brands and have experimented in the past, but generally, and in my personal experience this has been the best way to get the most favourable results.
A rangefinder camera is typically fitted with a split-image, range-finding focusing mechanism. This allows the photographer to place any point within a scene into sharp focus. Most varieties of rangefinder show two images of the same subject through the viewfinder, one of which moves when the focus ring on the lens is turned. When the two images coincide and fuse into one, the distance can be read off the lens markings and that point in the scene will be in sharp focus.
The newer Leica rangefinder cameras have another trick up their sleeve, the ability to use an electronic view finder and focus peaking. Whilst, not as authentic as the rangefinder experience and using the hot shoe connection on the M240, M10 series it does make focussing a little more intuitive, particular on the more telephoto end at 90-135mm, and of course the wide end too 28mm and below when you’re pushing the limits of the optical view finder.
Using such a camera, even with the EVF is an odd choice to some, but for me, it has become a way of finding inner peace with my photography. I'm not going to get all spiritual either, I refer to the lack of beeps, automation, complex menus, film emulation modes. Two of my cameras don’t even have a rear screen. Coupled with beautifully simple, manual and very mechanical controls for shutter speed, aperture, ISO and of course lens focus, the resulting image is entirely down to you, simple !
In my opinion, the rangefinder experience distils the art of photography down to essential components which allow complete control and flexibility to shape and manipulate the final image in it's raw most form. You capture light as it falls, under or over expose to heighten or soften drama and then place the focal point exactly where you want it.
By doing so, you draw people into the image in a way you created in your mind's eye long before releasing the shutter. Sometimes, it's just about creating something interesting from an otherwise ordinary scene. This is very much the case in street photography. Whether I’m documenting a moment in time, people, places or still life, I think about the final image and try to create something I will be pleased with and others might enjoy. Being in control of the camera and with a little bit of forward planning, you start to develop your own style.
It took me a long time to arrive at rangefinder cameras and it's funny to think that the cameras I use today, are still based on a 1954 design by Oskar Barnack, who was born in 1879.
Technology for me is about bringing advancements that enrich lives, make things easier, faster and get you to a better result, more quickly and with less fuss.
Automate those things that are prone to error using a standards based approach, derived from science to deliver consistent and accurate results every time. Just give me the freedom to make manual inputs or override settings so I can experiment and change the outcome.
Sounds like the bones of a plan doesn't it? Cameras have been doing precisely this for many years. Sadly many modern cameras have gone into technology overload and now have too many features to list.
Auto exposure, whether aperture or shutter priority and of course autofocus have been around for many years. My first new camera was a Nikon FE kit comprising a 50mm ‘standard’ lens and a 28mm wide angle lens.
I wanted to learn about photography with something a little more capable than the family camera which I later inherited from my Dad, an Olympus Pen-EE, 35mm half-frame, which I still have.

Nikon FE, My first SLR camera.

The Olympus Pen-EE, 35mm half-frame camera could shoot 72 pictures on a 36 exp roll
I even managed to get work to pay for some of my film development costs, by taking the odd picture (of telecoms equipment) during site surveys. This really helped me enjoy my photography and provided me with a lot more film and lab-processing than I could otherwise afford. It helped me gain experience as I learned to use my new camera.
I remember reading about the relationship between shutter speed, aperture, and film speed. Having aperture and shutter priority allowed me to experiment with different values to see the effect in my photos, slowing down water, blurring backgrounds etc without having to worry about getting the exposure wrong.
Later, I started to build up my kit, adding a 70-200mm telephoto lens first, then a 28-135mm. The 50mm lens didn't really see the light of day after I bought zoom lenses. In fact, I took it out of my bag after a while. I took loads of photos, most of which were pretty unremarkable.
Creativity was limited to slowing down shutter speeds to give a sense of motion, a waterfall here and there, a moving vehicle showing the wheels turning, that sort of thing. Depth of field wasn't really in my repertoire any more with maximum apertures of f4.5 or f5.6 respectively on my new zoom lenses.
I purchased a cheap filter kit along the way adding colour filters for black and white, a starburst filter which I used to create unrealistic pictures of my car with the headlights on and most useful of all, a polarising filter which cleaned up shiny windows, or reflections allowing deeper colours, improved contrast improving some of my still very average pictures.

A cheap filter kit was bound to help me find my creative mojo… wasn’t it?
A few years later, I was in a camera shop, fancied a change and a used, Minolta Dynax 7000i caught my eye. It had new, modern features, a digital display, a shutter speed up to 1/4000th of a second. It also had a 3FPS burst mode, which I could simply not afford to use and never did. I felt like an enthusiastic amateur photographer now. A single lens covering 35-80mm allowed me to start travelling and recording places I visited. I still have some fantastic memories of amazing places, captured in quite unremarkable photographs with that camera but I enjoyed using it.

The Minolta Dynax 7000i had a burst mode I couldn’t afford to use
I've always taken a camera travelling but had more or less given up on trying to be 'good' at photography. I settled on recording memories of things I liked, places I visited or friends I met along the way. I accepted that I just wasn't very good at photography. I did however enjoy taking photographs, mostly using automatic modes but adding creative angles, or lighting here and there for dramatic effect.
My interest was piqued again briefly when cameras went digital but it was many years before I considered them good enough to replace my film camera.
Things started to change for me when Canon brought out their 'Digital Rebel' model 350D Digital SLR. This camera changed the face of photography forever and put a 'decent' DSLR into the hands of many thousands of enthusiasts worldwide at an affordable price.
It was their most successful DSLR of all time. The camera was only 8MP but did everything you needed and more importantly, opened up a vast catalogue of EF mount lenses from Canon and just about every other manufacturer. The possibilities were now truly endless, Canon have a vast range of lenses to suit all budgets and technical applications. I purchased my first digital DSLR with 18-55mm kit lens like so many other people.

The Canon 350D changes photography forever and put a DSLR in the hands of the masses
I started to get back into photography and relearned all those magical combinations of shutter speed, aperture and now ISO speed. Very quickly I quickly dispensed with the kit lens which was known to not be very good and added a few more lenses. Most notably, I saved up for a 70-200 f4L. A professional series telephoto with F4 aperture throughout the range. Not as expensive as the f2.8 version and no image stabiliser, but extremely effective at producing dreamy portraits by isolating subjects from their background with stunning bokeh.
I could create 'good' portrait shots again, just like I'd done all those years ago with my 50mm lens which I'd almost forgotten about.
I got talking with friends who'd also discovered this remarkable camera. Some of them were taking very impressive pictures and getting really creative. I met a chap, who later became my business partner, Jason. He ran a small photographic studio in Hertfordshire and was offering 'Group-Shoots' to earn a little extra cash for his studio. For £25.00, you could turn up and shoot professionally lit studio photos. Groups were limited to no more than 10 photographers. The studio would lay on a theme, models and studio lighting. Sets were metered up and photographers were given the settings to use, usually 1/125th sec, f8 & ISO100. I started to build a portfolio of much better images some of which impressed my friends.
I met a lot of enthusiastic photographers and got to see, and try some impressive cameras and lenses. Enticed by the immense creativity available, I continued going to the group shoots until I ended up helping to run them. My camera had been upgraded several times, but more importantly I'd learned about lenses again, the fundamental component to photographic creativity and the better place to spend money than on buying the latest camera body.
At this stage, most sensors were similar in size and it was the bells and whistles that differentiated camera bodies. In the studio, I was using manual settings, didn't need face recognition and modes but I could definitely benefit from some good lenses.
I started shooting behind the scenes at the group shoots. It was as interesting shooting the photographers as it was being on set. I was capturing the 'shoot' and creating some great imagery to advertise our 'group shoots'. I spent a lot of time at the studio andI started to get commissioned for my own 'paid' shoots and by definition transitioned to a professional photographer. After a white, I even quit my day job to do this full-time which worked well for a while. I built a steady stream of private and commercial clients.
Jason and I used to regularly set each other challenges and a favourite was the ‘50mm challenge’. One year, we went skiing together and took our cameras fitted only with 50mm lenses. They were pin-sharp with great contrast and bokeh. I came back with the best set of holiday photos ever.
I was so impressed that I never went anywhere without my 50mm lens and was usually looking for an excuse to use it. Notably, I got commissioned to do some photography for the Greek tourist board with 4 lovely models including Christina Russo. I had my Pelican case packed with L-Series glass and several camera bodies and Jason called '50mm challenge'. At first I thought there is no way I can do this without my pro lenses, then I thought about it and after some discussion with Jason decided it might just be a brilliant choice. I could actually shoot the entire week with just a 50mm lens.
I did exactly that and came back with a great set of photos and a happy client after a week of photography in Corfu. I worked at all times of the day and night, the 50mm lens was one of the most versatile and creative lenses I'd ever used, not to mention much lighter and easy to travel with. I had accepted the challenge on a pro shoot and this changed my attitude towards prime lenses forever. I know I came back from that trip, a better photographer too.

50mm Challenge - Agios Giordis beach, Corfu, Greece
I had mastered manual control of my camera and felt able to shoot anything. I had my preferred genres but wasn't afraid to tackle anything that was asked of me. I picked up some interesting commissions over the next few years.
For work, I was using the famous Canon 1D series professional bodies with L-Series lenses. I carted my gear around in a very heavy Pelican Case to keep it dust free and safe from harm. I shot absolutely anything and everything that came my way and learned that the most interesting stuff was usually the least well paid, and the most benign, often the most lucrative.
Case in point, Jason and I were commissioned to shoot 20,000 different buttons! Every kind of button ever made, plastic, glass, precious metal, leather, you name it I never knew buttons could be so varied. For 6-weeks solid, Jason and I would sit in my home studio and shoot, edit and catalogue buttons at night.
Things changed and the UK was hit with a bit of a recession back in 2007. At first I got really busy as advertising campaigns ramped up but then it went quiet as people ran out of money and the first budgets to get the chop were marketing. I'd sit and wait 3-weeks between phone calls. I had some work, but my 5-year business plan wasn't stacking up and I still had bills to pay. Much as I hated the idea, I went back to my safe, and much more stable telecoms work, picking up the odd photography commission here and there.
I got used to a regular, reliable income again and started taking photos for fun again more than for money. Being in regular employ, I was once again able to travel and needed a camera that was easier to carry about than the great big SLR I'd been using for the last 15 years.
At Photokina 2010 in Cologne, Germany, Fujifilm announced a high-grade digital compact camera with a large APS-C sensor and a fixed f2, 23mm lens (35mm equivalent field of view, FOV). The X100 took the photographic world by storm much like Canon's 350D and once again changed the path of photography for many. A compact, mirrorless camera with a decent sensor and a high-quality, wide-aperture prime lens. Everything you need to take great, professional looking photos just not as universal flexible as a Pro DSLR. Perfect !
I got excited about this camera and lots of working pro's claimed to have one of these in their kit bag, or use one for personal projects. Once it had come down in price a little, I bought one and took it everywhere with me.
It would fit in your pocket and looked like a retro camera. It reminded me of the Leica rangefinders a little. It's not a rangefinder but I nick-named it my 'Leica-look-a-likey'. It's been through several iterations since then and with every one gets better and better. The latest versions look identical to the original, but are faster, higher resolution and more refined to use.
Fuji have since become a respected name in professional photography make great cameras and even better lenses After the X100 I bought an X-Pro1. Much the same design, but with the ability to use interchangeable lenses. I started traveling with the X-Pro1 and a couple of small, very fast prime lenses.
I did a lot of personal projects with the X100 and X-Pro1 including a series called 'a great photo every day'. Travel was a breeze with either of these cameras, being small and compact. Using prime lenses honed my skills, control over depth of field and 'zooming with my feet' rapidly became the norm once again.
Paid work was occasional at this point and the canon gear was seeing less and less use. The Fuji kit was smaller, lighter and worked brilliantly in low-light. I remember photographing one of my son's plays at drama school using just the available light with a 35mm f1.4. The results were outstanding and all shot from my seat at the edge of an aisle without upsetting any of the audience with the giant white Canon lenses, and loud shutter.
The only thing I didn't like was the fly-by-wire electronic manual focus. It wasn't entirely convincing but was useable. The lens aperture control was operated in the traditional way, a ring on the lens, but like the focus was actually fly by wire, electronic adjustment but more convincing with physical click positions. A proper manual focus lens in this form factor would open the door to ‘zone focussing’, exactly what you need for candid street photography. I could never trust fly-by-wire focus to do this realiably because I couldn't tell at a glance where the focus was at without referencing the electronic scale in the viewfinder.
It was around this point when I first really started to take notice of the Leica rangefinder cameras. The fully manual and mechanical way they operate was precisely what I was looking for. I read anything and everything I could about them to the point where I felt I really understood them, could visualise in my head what shooting with one of these 1954 design masterpieces would feel like yet I'd never actually seen one in the flesh or held one in my hand.
I could imagine the solid, weighty feel and high quality controls. Precise mechanical clicks from the shutter speed dial, smooth manual focus, and luxurious yet precise selection of lens aperture. I could visualise what it would be like to use the rangefinder and how precisely I could use this to drop the focus exactly where I wanted it and see through the optical viewfinder it in all light conditions.
No question, Leica make ‘Marmite’ cameras, you either love them or hate them and to be fair, most people would never buy one. They are clearly not for everybody, being expensive is one thing but no more so than any mainstream brand pro camera. They do hold their value a lot better though. With very few if any bells or whistles to speak of they are not going to appeal to everyone. The most common question people ask about them is 'Why ?'. For me however the question was rapidly becoming, Why not ?.
In January 2017, Leica introduced the new M10. Four years later in 2021, there are currently 5 versions of the M10 as it's still the current model. It was November 2017 when I started looking at buying my first Leica and the previous model, M240 was still very much available and also had a full-frame 24MP sensor like the M10. The M10 had improved on the M240 in a few subtle ways but not so much so as to render the M240 obsolete. It was and still is a fantastic camera capable of outstanding results but with a new model available, prices were lower.
The M240 or to use it's formal nomenclature 'Leica M, Typ240', was originally launched in September 2012 replacing the previous model an 18MP, full-frame, called the M9. The M9 has a CCD sensor which was known for corrosion and expensive replacement but for some has the best ‘Leica look’ of all the digital M cameras.
It seems odd to think I was looking at buying a brand new, 5yr old camera, but unlike other mainstream brands, Leica kit is in relative short supply, all coming from a small factory in Wetzlar, Germany.
Leica M cameras have been used by some of the best photographers that ever lived and have created some of the world's most iconic photographs. This in part may be down to the small form factor, practicality, superior lenses and mechanical reliability, but you'll need some skill to use one well.
You would really be missing a trick if you didn't use Leica glass on your Leica camera. They produce some of the very best lenses in the world and they have a real character about them. Colour rendition, contrast, sharpness, low distortion, bokeh are all typically superb attributes that you'll hear mentioned during any technical review of a Leica lens.
After 3 years of dreaming of owning one of these cameras, I decided to buy my first Leica rangefinder. In November 2017, I met Tom, at London Camera Exchange, Baldwin Street, Bristol who is now one of my very good friends. He told me of a shoot that was taking place at Leigh Court, Bristol, a well-known wedding venue. A group of local photographers, make-up artists and models, were creating promo shots for the venue to simulate various wedding scenarios. Tom suggested this would be a great place to test the Leica for the first time and suggested I might like to 'Try' before I buy and put an M240 through it's paces.
Tom lent me a demo model, a black M240 and fitted it with a 35mm Summicron f2 lens. He also took along a 50mm Summicron and a 28mm Elmarit-M from the second hand stock at the shop for me to try.
I was really excited and couldn't wait to try the camera. The Leica felt like an old friend. I was instantly at home with it and though I'd never held one in my hands, knew instinctively how to use it. The menus were uncomplicated as I already knew, everything else was fully manual and worked exactly as I'd read. I didn't need any introduction to the rangefinder focussing, I instantly felt comfortable with it.
I'd read that when you 'nail the focus' on a Leica M, it was highly rewarding but was also warned that a new user should be prepared to miss the focus a good few times as it takes time to master. I also read that it slows you down initially and requires much patience. As an experienced manual photographer, this didn't really worry me but wasn’t in any rush to get my shots.
I'd learned of the exposure metering and how to dial it in using the led arrows in the viewfinder, how to estimate half or full stop over/under exposure and how instinctively to turn the shutter speed dial in the direction of the arrows to make an adjustment if a little over, or under exposed. it felt very natural, like I'd been using a Leica for years.
I fired off about 150 shots that day in all light conditions. I was able to push the limits of low light, test out depth of field, use natural light, studio light and check out the perspective distortion, or lack of in magnificent rooms with detailed and exquisite décor but more importantly for the test, lots of straight, perpendicular lines.
Paul pictured below was the very first portrait I ever shot with a Leica. In fact this was the first time I pressed the shutter on a Leica M and instantly set my heart racing when I saw the result. Not that you couldn't get this shot with another camera, but I'd nailed the focus first time and caught the light beautifully with no electronic aids or preview of how the shot was going to come out. I processed the shot in black and white but the original in colour was just as impressive and the colours really popped.

Paul Walker - The first portrait I shot with a Leica, the first picture I took with a Leica
I'd read somewhere that the rear screens on Leica's aren't the best, so you really need to check images on a computer to validate them. The image looked great on the rear screen but when I saw them on my computer, even better. My mind was made up, I was going to buy a Leica M and having used these three lenses I had to consider them too. It was looking as though I was going to have to sell not just some of my Canon gear, but realistically all of it to buy this new kit. An interesting position for a semi-working photographer to be in as there are clearly limitations with manual rangefinder cameras and particular jobs which I would no longer be able to do.
I purchased from Tom a brand new, Leica M240 in silver, the second hand 50mm and 28mm lenses which I’d used at Leigh Court and ordered a new 35mm Summicron in silver to match the camera. I wasn't surprised to find myself using mostly the 'nifty fifty'. One of my first photo shoots was at the opening of the new Queensferry Crossing. For 1 day only, people were invited to walk from one side of the crossing to the other in ticketed, organised groups. During the walk, I met the first minister, Nicola Sturgeon and managed to get a photo of her with my wife's parents who'd walked across the previous crossing some 50 years earlier.
The Leica 50mm Summicron is one of the best 50mm lenses ever made and it's actually the one by which other manufacturers measure the performance of their own 50mm lenses. Sharp does not begin to describe this lens and the out of focus 'bokeh', or blurred background on a Leica 50 is out of this world. The more expensive f1.4 Summilux, is known to have the best bokeh of any Leica lens ever made and is now my default standard lens. Leica also have the f0.95 Noctilux but it’s quite heavy compared to the other lenses is very expensive. Out of reach for most and with such a narrow depth of field, it’s a specialist lens.
In 2018, my work took me to Kuala Lumpur for a couple of years so I took my M240 with me. Every weekend, I'd walk around the city, or head to Singapore and started to build up my Asia portfolio. I've also spent a lot of time walking the streets of Kerala, South India with the Leica. I once walked the whole length of Chengannur during the Pongai festival where Hindus come from all over the country on a pilgrimage to the temple and the women cook an offering to the gods at the roadside waiting to be blessed by the high-priest later in the day as he comes through. I captured hundreds of images here and was delighted that Leica published some of them in LFI (Leica Fotographie International).

Pongai Festival, Chengannur, Kerala, India published in Leica Fotographie International
My best ever photo opportunity while travelling in India was spending 3 hours in the famous Dharavi slums of Mumbai. The most amazing and exhilarating experience ever in my lifetime.
I live to travel the world and do so as often as I'm able, leaving only footprints as I always say, and taking only photos. The 2020 Coronavirus pandemic has severely curtailed my travel, but hopefully we’re nearing the end of this difficult time and things will slowly return to normal.
My cameras these days are M10 models and I've settled on the Summilux lenses at 28mm and 50mm for most of my work .They are both brilliantly sharp, have amazing bokeh and being able to open the aperture up to f1.4, I can use them in low light too. I also keep a super-wide Tri-Elmar 16-18-21 and a 75mm Summicron for arty, super-wide or telephoto requirements respectively. I can fit the entire kit into a small kit bag or rucksack but usually just have just one camera with me with one or two lenses. As well as my digital cameras, I shoot a 1967 Leica M4 film camera. This usually loaded with Kodak Portra 400 colour film or Ilford HP5 black and white.
One of my digital cameras is the M10-D which has no rear screen and is one of the most controversial cameras yet for Leica haters. Leica say it’s a digital camera with an Analogue soul. For me it takes the magical experience of film photography and brings it into the digital world. Its the closest I can get to the film experience in one of the most stealthy setups you can buy without the hassle of processing film or scanning negatives. Everyone thinks it’s a film camera, who am I to disappoint? There is often merit to not having a screen on the back of your camera when shooting ‘street’. It takes digital distractions out of the mix and boasts a longer battery life than my other M10. The user has to work to understand how to get the best results but is rewarded with outstanding images befitting of a Leica Ambassador which is about as much as one could ask for from their tools of the trade.

The M10-D doesn’t have a rear screen, less is more, right?
So we come back to the original question, Leica Pourquoi ? (Why, literal translation ‘for what’). I think I’ve answered the ‘Why?’. ‘For What?’, the simple answer is, 'If I can’t shoot it on my Leica, I’ll leave it to someone else.' There are no shortage of photographers in this world. Each to their own and the nicest thing for me is that I’m no longer a full-time working photographer, so I just get to shoot the things I want to.
Whatever you shoot, enjoy learning about your equipment and how to get the best out of it. If you find that you're not getting the results you expect, take a step back and return to the basics. Remind yourself of the relationship between shutter speed and aperture and how it impacts the final image. Use ISO to tune the sensitivity of the sensor and understand how to use it in high and low light. With digital cameras, you have no reason not to fire off hundreds of shots and test things out. If you can, turn off as many of the digital distractions as possible.
For me it took a long time to really understand why my images were quite so unremarkable. I went back to basics and spent the next few years developing my own style. Now, I'm reasonably content with what I do, I just need more time to get out and enjoy photography.

New Website
How hard can it be ?
So, I used to have a website to sell my work, advertise my services and place a portfolio of my best images online for people to see. As I recall, this was quite a ‘painful’ task at the time which went through something like five complete ‘start-from-scratch’ iterations over the years. Worse, it was all coded by me using dreamweaver which I then uploaded to a web-server using FTP.
Creating new galleries was a nightmare as they were all ‘flash’ galleries generated from Lightroom, which I uploaded manually and used links to initiate them. Then of course, everyone was buying iPhones and iPads, the world stopped using 'flash’ and all of my galleries stopped working so I had to start over.
This time around, things were meant to be so much easier, after all, I’m not touting for work, I’ve only got to choose my favourite images and am using a templated website builder from Squarespace… how hard can it be?
Well, actually harder than I first thought. The truth is, I’m more interested in taking photos and experiencing life than sitting in front of my computer which I do enough of during the normal working day.
Please bear with me while I pull the new site together, very slowly and a little at a time. I’ll try to keep the gallery content dynamic and interesting and use the blog to upload new articles, reviews, projects and things of interest.
Right now, I’m stripping a lot of things out (again) because I’ve already managed to over-complicate the site by trying to do too much.
At least this time around, I have a logo that I’m happy with.
